
When either the front or rear brake is applied, the brake light goes on. The front brake light switch requires no adjustment, but the rear brake light switch should be adjusted in accordance with the Periodic Maintenance Chart.
Inspection
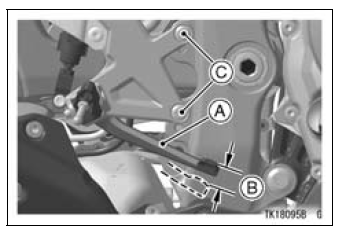
A. Brake Pedal
B. 10 mm (0.4 in.)
C. Bolts
Brake Pedal Travel

Adjustment
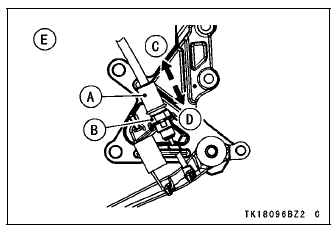
A. Rear Brake Light Switch
B. Adjusting Nut
C. Lights sooner
D. Lights later
E. Viewed from behind the bracket
NOTICE
To avoid damaging the electrical connections inside the switch, be sure that the switch body does not turn during adjustment.
NOTE
Install the front footpegs with same height on both sides. Refer to the Front Footpeg Position in General Information chapter.
 Front and Rear Brakes
 Electronic Steering Damper
Crankshaft Removal
Split the crankcase (see Crankcase Splitting).
Remove:
Connecting Rod Big End Nuts [A]
Connecting Rod Big End Caps [B]
NOTE
Mark and record the locations of the connecting rods
and their big end caps so that they can be reassembled
in their original positions.
Remove the crank ...
ABS Indicator Light (For models equipped with KIBS)
: Normally
the ABS indicator light goes on when the ignition switch is turned
ÔÇťONÔÇŁ and goes off shortly after the motorcycle starts moving. If the ABS is
normal,
it stays off. If the ABS indicator light shows any of the following, a fault or
faults may
have taken place in the ABS. You ...
Wheels
Tubeless tires are installed on the
wheels of this motorcycle. The indications
of ÔÇťTUBELESSÔÇŁ on the tire side
wall and the rim show that the tire and
rim are specially designed for tubeless
use.
A. ÔÇťTUBELESSÔÇŁ Mark
A. ÔÇťTUBELESSÔÇŁ Mark
The tire and rim form a leakproof unit
by ...