

AL: Tighten the two clamp bolts alternately two times to ensure even tightening torque.
HG: Apply high-temperature grease.
R: Replacement Parts WL: Apply soap and water solution or rubber lubricant.
Specifications
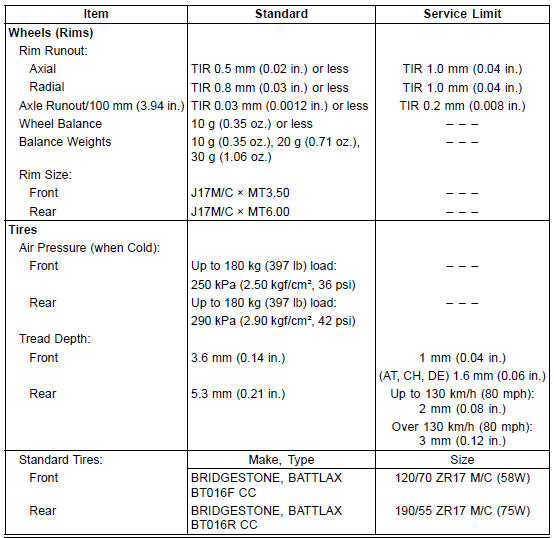
| WARNING Some replacement tires may adversely affect handling and cause an accident resulting in serious injury or death. To ensure proper handling and stability, use only the recommended standard tires for replacement, inflated to the standard pressure. |
 Wheels/Tires
 Special Tools
Intake Air Pressure Sensor #2 Output Voltage Inspection
Measure the output voltage at the intake air pressure sensor
#2 in the same way as input voltage inspection, note
the following.
Disconnect the intake air pressure sensor #2 connector
and connect the measuring adapter [A] between these
connectors.
[B] Main Harness
[C] Intake Air Pressu ...
Front Footpeg Position
The right and left front footpegs can
be selected to one of two positions to
suit the front preferences. Have the
front footpeg positions changed by an
authorized Kawasaki dealer.
A. Bolts
B. Upper Position (Standard)
C. Lower Position
NOTE
Install the front footpegs with same
heig ...
Crankshaft Sensor Peak Voltage Inspection
Refer to the Crankshaft Sensor Peak Voltage Inspection
in the Electrical System chapter.
If the reading is within the standard, remove the ECU and
check the wiring for continuity between harness connectors.
Special Tool - Hand Tester: 57001-1394
Disconnect the ECU and sensor connector ...