
NOTE
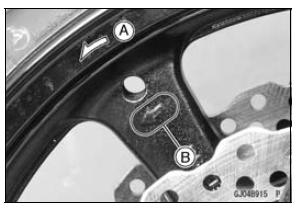
The direction of the wheel rotation [A] is shown by an arrow [B] on the wheel spoke.
The collars are identical.
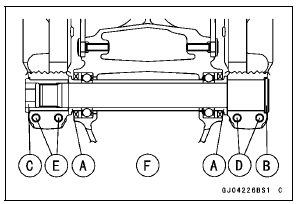
Right Front Axle Clamp Bolts [D] Left Front Axle Clamp Bolts [E] Viewed from Rear [F]
Torque - Front Axle Nut: 127 N·m (13.0 kgf·m, 94 ft·lb)
NOTE
Put a block in front of the front wheel to stop moving.
Next, tighten the left front axle clamp bolts.
Torque - Front Axle Clamp Bolts: 20 N·m (2.0 kgf·m, 15 ft·lb)
NOTE
Put a block in front of the front wheel to stop moving.
Next, tighten the left front axle clamp bolts.
Torque - Front Axle Clamp Bolts: 20 N·m (2.0 kgf·m, 15 ft·lb)
NOTE
Tighten the two clamp bolts alternately two times to ensure even tightening torque.
| WARNING After servicing, it takes several applications of the brake lever before the brake pads contact the disc, which could result in increased stopping distance and cause an accident resulting in injury or death. Do not attempt to ride the motorcycle until a firm brake lever is obtained by pumping the lever until the pads are against the disc. |
 Front Wheel Removal
 Rear Wheel Removal
Front Fender Removal
Remove:
Bolts [A] with Washers (Both Sides)
Reflectors (Both Sides, US, CA, CAL and AU Models)
Front Fender [B]
Take the brake hose off the clamp [C] (both sides).
Front Fender Installation
Apply a non-permanent locking agent to the front fender
mounting bolts.
Tighten:
...
Torque and Locking Agent
The following tables list the tightening torque for the major fasteners
requiring use of a
non-permanent locking agent or silicone sealant etc.
Letters used in the “Remarks” column mean:
AL: Tighten the two clamp bolts alternately two times to ensure even tightening
torque.
G: Apply ...
Torque Limiter Installation
Apply molybdenum disulfide grease to the torque limiter
shaft [A].
Install the torque limiter [B], the collar [C] and the shaft.
Turn the large-hole end of the shaft to inside as shown in
the figure.
Replace the washer [D] with a new one.
Apply a non-permanent locking agent to the t ...