
NOTE
Do not remove the bolts [D] because the reflector in the headlight comes off.
 Headlight Bulb Replacement
 City Light (LED) Removal/Installation
Air Intake Duct Assembly (Other than US, CA and CAL Models)
Install the seals [A] as shown in the figure.
Fit the projections [A] of the air intake valve to the hole [B]
of the air intake ducts.
Tighten:
Torque - Air Intake Duct Assembly Screws: 1.5 N·m (0.15
kgf·m, 13 in·lb)
Hang the shaft [A] to the air intake valve securely ...
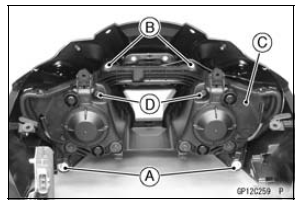
Instrument display brightness control
The brightness of the tachometer
LED segments and illumination of the
multifunction meter are controlled automatically
depending on the ambient
brightness.
A. Tachometer
B. Ambient Brightness Sensor
C. Multifunction Meter
NOTE
Be careful not to cover the ambient
brightness sensor on th ...
Torque Limiter Installation
Apply molybdenum disulfide grease to the torque limiter
shaft [A].
Install the torque limiter [B], the collar [C] and the shaft.
Turn the large-hole end of the shaft to inside as shown in
the figure.
Replace the washer [D] with a new one.
Apply a non-permanent locking agent to the t ...