
NOTICE
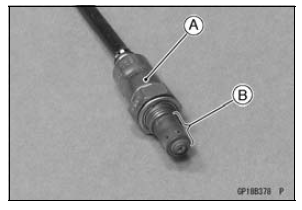
Never drop the oxygen sensor [A] especially on a hard surface. Such a shock to the unit can damage it. Do not touch the sensing part [B] to prevent oil contact. Oil contamination from hands can reduce sensor performance.
Oxygen Sensor Inspection (Equipped Models)
Oxygen Sensor Heater Inspection (Equipped Models)
 Oxygen Sensor Removal (Equipped Models)
 Gear Position Switch Removal
Meter Unit Circuit (ZX1000K Model)
1. Ignition Switch
2. Joint Connector F
3. Stop Watch Button
4. Oil Pressure Switch
5. Crankshaft Sensor
6. Water Temperature Sensor
7. Gear Position Switch
8. Intake Air Temperature Sensor
9. ESD ECU (ZX1000JD/KD)
10. ECU
11. Rear Wheel Rotation Sensor
12. Frame Ground 1
13. Engine ...
Fuel Filter Cleaning
The fuel filter [A] is built into the fuel pump and can not be
cleaned or checked.
If the fuel filter is suspected of clogging or being damaged,
replace it with the fuel pump as a set.
Fuel Pump Circuit
1. Ignition Switch
2. Engine Stop Switch
3. Joint Connector E
4. ECU
5. Engine G ...
Transmission Assy Installation
Assemble the transmission assy (see Transmission Assy
Assembly).
Be sure that the dowel pins are in position.
Install the transmission assy on the crankcase.
Tighten:
Torque - Transmission Case Bolts: 20 N·m (2.0 kgf·m, 15
ft·lb)
Install:
Shift Shaft (see External Shift Mechani ...