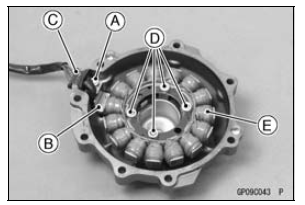


 Alternator Cover Installation
 Stator Coil Installation
Oil Pump Drive Gear Shaft Installation
Apply molybdenum disulfide grease [A] to the oil pump
drive gear shaft.
Apply molybdenum disulfide oil solution to the followings.
Transmission Case [B]
Crankcase [C]
Install the oil pump drive gear shaft and washer [D] as
shown in the figure.
Install the new circlip [E] into the ...
Crankshaft Side Clearance Inspection
Insert a thickness gauge [A] between the thrust washer
[B] on the crankcase and the crank web [C] at the #3 main
journal to determine clearance.
If the clearance exceeds the service limit, replace the
thrust washers as a set and check the width of the crankshaft
#3 main journal.
Cra ...
Safe riding technique
The points given below are applicable for everyday motorcycle use and
should
be carefully observed for safe and effective vehicle operation.
For safety, eye protection and a
helmet are strongly recommended.
You should be aware of and verify
the applicable safety regulations in
force prior ...