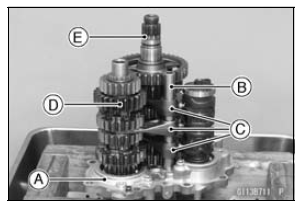

Shift Rod [B] Shift Forks [C] Drive Shaft [D] Output Shaft [E] Shift Drum Assembly

 Transmission Assy Removal
 Transmission Assy Assembly
Alternator Rotor Removal
Remove the alternator cover (see Alternator Cover Removal).
Clean off the oil from the outer circumference of the rotor.
Hold the alternator rotor steady with the rotor holder [A]
and suitable washer or plate [B].
Special Tools - Grip [C]: 57001-1591
Rotor Holder: 57001-1666
Flywheel P ...
Intake Air Pressure Sensor #1 Removal
NOTICE
Never drop the intake air pressure sensor #1 especially
on a hard surface. Such a shock to the sensor
can damage it.
Remove:
Air Cleaner Housing (see Air Cleaner Housing Removal
in the Fuel System (DFI) chapter)
Intake Air Pressure Sensor #1 Connector [A]
Remove the intake air ...
Bolt and Nut Tightening
In accordance with the Periodic Maintenance Chart, it is very important to
check
the tightness of the bolts and nuts listed here. Also, check to see that each
cotter
pin is in place and in good condition. Please ask your authorized Kawasaki
dealer
for torque values.
1. Clutch Lever Hol ...