
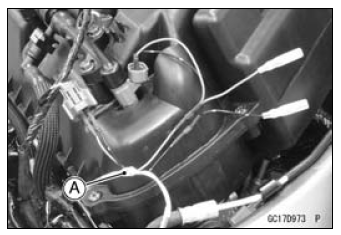
Main Harness [B] Secondary Fuel Injector #1 [C]
Special Tool - Measuring Adapter: 57001-1700
Secondary Fuel Injector Power Source Voltage Connections to Adapter:
For Secondary Fuel Injector #1, #2, #3, #4
Digital Meter (+) → R (injector W/R) lead
Digital Meter (–) → Battery (–) terminal
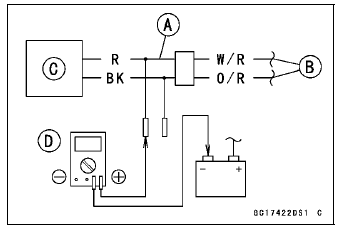
Power Source Voltage Standard: Battery Voltage for 3 seconds, and then 0 V
If the reading stays on battery voltage and never shows 0 V, check the fuel pump relay (see Relay Circuit Inspection in the Electrical System chapter).
If the fuel pump relay is normal, check the ECU for its ground and power supply (see ECU Power Supply Inspection).
If the ground and power supply are good, replace the ECU (see ECU Removal/Installation).
If there is still no battery voltage, check the fuel pump relay (see Relay Circuit Inspection in the Electrical System chapter).
If the fuel pump relay is normal, check the power source wiring (see wiring diagram in this section).
Special Tool - Hand Tester: 57001-1394
If the wiring is good, check the ECU for its ground and power supply (see ECU Power Supply Inspection).
If the ground and power supply are good, replace the ECU (see ECU Removal/Installation).
If the reading is in specification, check the output voltage (see Fuel Injector Output Voltage Inspection).
 For Primary Fuel Injectors
 Fuel Injector Output Voltage Inspection
Crankshaft Main Bearing
Insert/Journal Wear Inspection
Split the crankcase (see Crankcase Splitting).
Cut strips of plastigage to journal width.
Place a strip on each journal parallel to the crankshaft
installed in the correct position.
Tighten the crankcase bolts to the specified torque (see
Crankcase Assembly).
NOTE
Do not turn ...
Meter instruments
Upper Button
Lower Button
Tachometer (with Shift-Up
Indicator)
Red Zone
Ambient Brightness
Sensor
Turn Signal Indicator Light
Warning Indicator Light
(Red)
Neutral Indicator Light
Multifunction Meter
High Beam Indicator Light
Warning Indicator Light
(Yellow)
Fuel ...
Drive Chain Lubrication Condition Inspection
If a special lubricant is not available, a heavy oil such as
SAE 90 is preferred to a lighter oil because it will stay on
the chain longer and provide better lubrication.
If the chain appears especially dirty, clean it before lubrication.
NOTICE
The O-rings between the side plates seal ...