
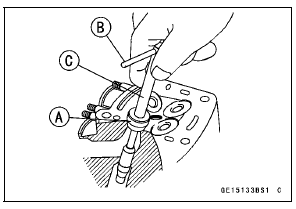
Repair the valve seat with the valve seat cutters [A].
Special Tools - Valve Seat Cutter Holder Bar [B]: 57001 -1128
Valve Seat Cutter Holder, 4.5 [C]: 57001 -1330
[For Exhaust Valve Seat]
Valve Seat Cutter, 45┬░ -  27.5:
27.5:
57001-1114
Valve Seat Cutter, 32┬░ -  28:
28:
57001-1119
Valve Seat Cutter, 60┬░ -  25:
25:
57001-1328
[For Intake Valve Seat]
Valve Seat Cutter, 45┬░ -  32:
32:
57001-1115
Valve Seat Cutter, 32┬░ -  33:
33:
57001-1199
Valve Seat Cutter, 60┬░ -  33:
33:
57001-1334
If the manufacturerŌĆÖs instructions are not available, use the following procedure.
 Valve Seat Inspection
 Seat Cutter Operation Care
Coupling Bearing Removal
Remove:
Coupling
Grease Seal
Circlip [A]
Special Tool - Inside Circlip Pliers: 57001-143
Remove the bearing [A] by tapping from the wheel side.
Special Tool - Bearing Driver Set [B]: 57001-1129
...
Swingarm Bearing Installation
Replace the needle bearings, ball bearing, grease seals
and circlip with new ones.
Install the needle bearings, ball bearing, grease seals and
circlip as shown in the figure.
Insert the needle bearing driver [A] into the needle bearing
[B] and press the needle bearing into the housing u ...
Coolant Change
WARNINGCoolant can be extremely hot and cause
severe
burns, is toxic and very slippery. Do not remove
the radiator cap or attempt to change the coolant
when the engine is hot; allow it cool completely.
Immediately wipe any spilled coolant from tires,
frame, engine or othe ...