
Air Switching Valve Removal/Installation
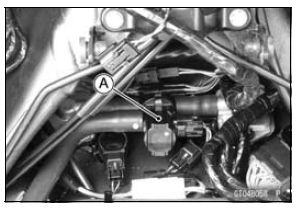
Air Switching Valve Inspection
If the air switching valve [A] is normal, check the wiring for continuity (see Air Switching Valve Circuit).
Special Tool - Hand Tester: 57001-1394
If the wiring is good, check the ECU for its ground and power supply (see ECU Power Supply Inspection in the Fuel System (DFI) chapter).
If the ground and power supply are good, replace the ECU (see ECU Removal/Installation in the Fuel System (DFI) chapter).
Air Switching Valve Circuit
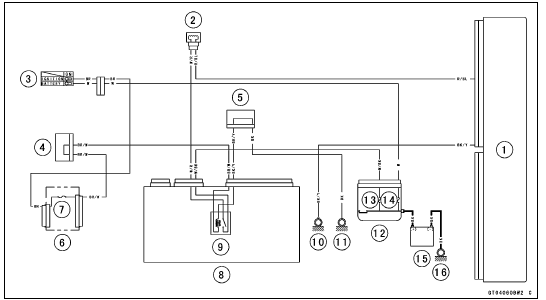
1. ECU
2. Air Switching Valve
3. Ignition Switch
4. Joint Connector F
5. Joint Connector A
6. Fuse Box 1
7. Ignition Fuse 15 A
8. Relay Box
9. ECU Main Relay
10. Frame Ground 1
11. Frame Ground 3
12. Starter Relay
13. ECU Fuse 15 A
14. Main Fuse 30 A
15. Battery
16. Engine Ground
 Exhaust Butterfly Valve Actuator Resistance Inspection
Exhaust Pipe Installation
Replace the exhaust pipe gaskets [A] and premuffler
chamber gasket [B] with new ones.
Install the premuffler chamber gasket to the premuffler
chamber [C] until it is bottomed so that the chamfer side
faces exhaust pipe [D].
Install the exhaust pipe clamp [E] as shown in the figure.
I ...
Valve Seat Repair
Repair the valve seat with the valve seat cutters [A].
Special Tools - Valve Seat Cutter Holder Bar [B]: 57001
-1128
Valve Seat Cutter Holder, 4.5 [C]: 57001
-1330
[For Exhaust Valve Seat]
Valve Seat Cutter, 45° - 27.5:
57001-1114
Valve Seat Cutter, 32° - 28:
57001-1119
Valve Seat ...
Moving Off
Check that the side stand is up.
Pull in the clutch lever.
Shift into 1st gear.
Open the throttle a little, and start to
let out the clutch lever very slowly.
As the clutch starts to engage, open
the throttle a littlemore, giving the engine
just enough fuel to keep it from
stallin ...
