
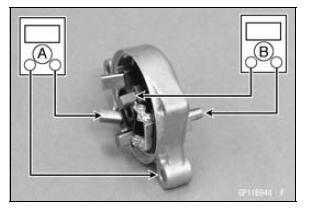
Right-hand End Cover and Negative Brushes [A] Terminal Bolt and Positive Brushes [B]
Special Tool - Hand Tester: 57001-1394
If there is not close to zero ohms, the brush lead has an open. Replace the brush plate assy.
 Armature Inspection
 Right-hand End Cover Inspection
Alternator Inspection
There are three types of alternator failures: short, open
(wire burned out), or loss in rotor magnetism. A short or
open in one of the coil wires will result in either a low output,
or no output at all. A loss in rotor magnetism, which may be
caused by dropping or hitting the alternator, by leav ...
Seat Cutter Operation Care
1. This valve seat cutter is developed to grind the valve for
repair. Therefore the cutter must not be used for other
purposes than seat repair.
2. Do not drop or shock the valve seat cutter, or the diamond
particles may fall off.
3. Do not fail to apply engine oil to the valve seat cutter
...
Sidestand Installation
Replace the sidestand nut [A] with a new one.
Apply grease to the sliding areas [B].
Tighten the sidestand bolt [C] first, and then the sidestand
nut.
Torque - Sidestand Bolt: 44 N·m (4.5 kgf·m, 32 ft·lb)
Sidestand Nut: 29 N·m (3.0 kgf·m, 21 ft·lb)
Install the spring [D] as sh ...