
NOTE
Be sure the battery is fully charged.
Harness [B] Water Temperature Sensor [C]
Special Tool - Measuring Adapter: 57001-1700
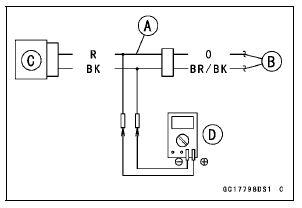
Water Temperature Sensor Output Voltage Connections to Adapter: Digital Meter (+) → R (sensor O) lead Digital Meter (–) → BK (sensor BR/BK) lead
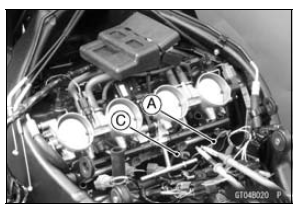
ECU Intake Temperature Sensor Throttle Body Assy Connectors
Output Voltage
Standard: About DC 2.80 2.97 V at
20°C (68°F)
NOTE
The output voltage changes according to the coolant temperature in the engine.
If the reading is within the standard, check the ECU for its ground, and power supply (see ECU Power Supply Inspection in the Fuel System (DFI) chapter).
If the ground and power supply are good, replace the ECU (see ECU Removal/Installation in the Fuel System (DFI) chapter).
If the reading is out of the standard, remove the ECU and check the wiring for continuity between harness connectors.
Special Tool - Hand Tester: 57001-1394
Disconnect the ECU and sensor connectors.
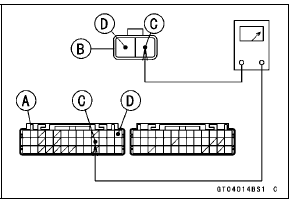
Wiring Continuity Inspection ECU Connector [A] ←→ Water Temperature Sensor Connector [B] O lead (ECU terminal 23) [C] BR/BK lead (ECU terminal 13) [D]
If the wiring is good, check the water temperature sensor resistance (see Water Temperature Sensor Resistance Inspection).
 Water Temperature Sensor Removal/Installation
 Water Temperature Sensor Resistance Inspection
Coolant Level Inspection
NOTE
Check the level when the engine is cold (room or ambient
temperature).
Check the coolant level in the reserve tank [A] with the
motorcycle held perpendicular (Do not use the sidestand).
If the coolant level is lower than the “L” level line [B], remove
the upper fairing assembly (s ...
Valve Guide Installation
Apply engine oil to the valve guide outer surface before
installation.
Heat the area around the valve guide hole to about 120
150°C (248 302°F).
NOTICE
Do not heat the cylinder head with a torch. This will
warp the cylinder head. Soak the cylinder head and
heat the oil.
Usin ...
Brakes
Brake Wear Inspection
Inspect the brakes for wear. For each
front and rear disc brake caliper, if the
thickness of either pad is less than
1 mm (0.04 in.), replace both pads
in the caliper as a set. Pad replacement
should be done by an authorized
Kawasaki dealer.
A. Lining Thickness
B. ...