
NOTICE
Never remove the sealing strip, or the battery can be damaged.
Do not install a conventional
battery in this motorcycle, or the
electrical system cannot work
properly.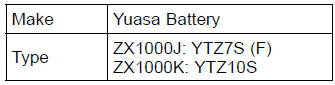
NOTE
If you charge the sealed battery, never fail to observe the instructions shown in the label on the battery.
| WARNING Battery posts, terminals and related accessories contain lead and lead compounds, chemicals known to the State of California to cause cancer and reproductive harm. Wash hands after handling. |
 Battery Maintenance
 Battery Removal
Rear Shock Absorber Removal
Remove:
Lower Fairings (see Lower Fairing Removal in the Frame
chapter)
Fuel Tank (see Fuel Tank Removal in the Fuel System
chapter)
Bolts [A] (Both Sides)
Foot Guard [B] (Both Sides)
Squeeze the brake lever slowly and hold it with a band
[A].
WARNINGBe sure to h ...
Camshaft Removal
Remove:
Cylinder Head Cover (see Cylinder Head Cover Removal)
Crankshaft Sensor Cover (see Crankshaft Sensor Removal
in the Electrical System chapter)
Using a wrench on the timing rotor bolt [A], turn the crankshaft
clockwise until the line [B] (TDC mark for #1,4 pistons)
on the timin ...
Related Parts Locations
KIBS Control
1. ABS performance equivalent to the current model (enhanced braking
stability)
By monitoring front caliper hydraulic pressure, KIBS regulates pressure
increases reducing the tendency
of the rear to lift. Before the ABS system fully reacts, KIBS system prevents
the pressure ...