
The battery installed in this motorcycle is a sealed type, so it is not necessary to check the battery electrolyte level or add distilled water.
The sealing strip should not be pulled off once the specified electrolyte has been installed in the battery for initial service.
However, in order to maximize battery life and ensure that it will provide the power needed to start the motorcycle you must properly maintain the battery’s charge. When used regularly, the charging system in the motorcycle helps keep the battery fully charged. If your motorcycle is only used occasionally or for short periods of time, the battery is more likely to discharge.
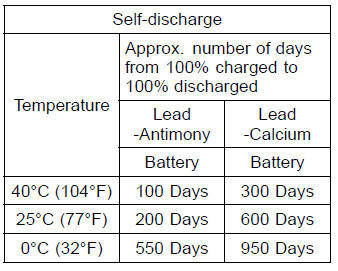
Due to their internal composition, batteries continually self discharge.
The discharge rate depends on the type of battery and ambient temperature.
As temperature rises, so does the discharge rate. Every 15°C (59°F) doubles the rate.
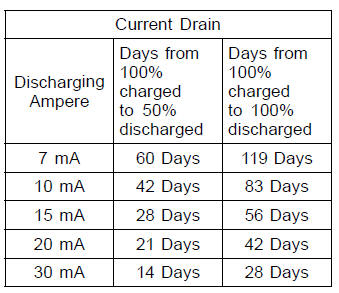
Electrical accessories, such as digital
clocks and computer memory, also
draw current from the battery even
when the key is switched off. Due to
a combination of such “key-off” draws
and hot temperature, a battery can go
from fully charged to completely discharged
in a matter of days.
In extremely cold weather the fluid in an inadequately charged battery can easily freeze, which can crack the case and buckle the plates. A fully charged battery can withstand sub-freezing temperature with no damage.
 Tire Wear, Damage
 Battery Sulfation
Stator Coil Installation
Apply a non-permanent locking agent to the threads of
the stator coil bolts and tighten them.
Torque - Stator Coil Bolts: 12 N·m (1.2 kgf·m, 106 in·lb)
Using a high flash-point solvent, clean off any oil or dirt
that may be on the silicone sealant coating area. Dry
them with a clea ...
Oxygen Sensor Removal (Equipped Models)
Remove:
Fuel Tank (see Fuel Tank Removal in the Fuel System
(DFI) chapter)
Right Lower Fairing (see Lower Fairing Removal in the
Frame chapter)
Disconnect the oxygen sensor lead connector [A].
NOTICE
Do not pull strongly, twist, or bend the oxygen sensor
lead. This may cause the wi ...
Air Intake Duct Removal
Remove:
Upper Fairing Assembly (see Upper Fairing Assembly
Removal in the Frame chapter)
Meter Bracket (see Meter Unit Removal/Installation in
the Electrical System chapter)
Immobilizer Amplifier [A] (Equipped Models) (see Immobilizer
System Parts Replacement in the Electrical System
...