
When the operator is driving the motorcycle for optimum fuel-efficiency, the economical riding indicator appears on the multifunction meter to indicate favorable fuel consumption. Monitoring the economical riding indicator can help the rider maximize fuel efficiency.
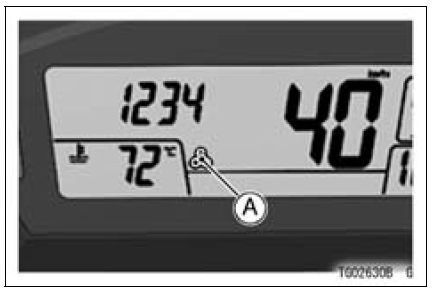
A. Economical Riding Indicator
| WARNING Failing to properly observe the road ahead increases the chance of an accident resulting in severe injury or death. Do not concentrate on the economical riding indicator by taking your eyes off the road; observe using peripheral vision. |
 Clock
Clock Power Mode Indicator
Radiator Fan Relay Inspection
Refer to the Relay Circuit Inspection in the Electrical System
chapter
If the radiator fan relay is normal, check the wiring for
continuity, using the wiring diagram in this section.
Special Tool - Hand Tester: 57001-1394
If the wiring is good, check the ECU for its ground and
power supp ...
Handlebar Removal
Remove:
Steering Damper (see Steering Damper Removal)
Clutch Lever Clamp Bolts [A]
Clutch Lever Assembly [B]
Left Switch Housing [C]
Handlebar Weight [D]
Left Handlebar Grip [E]
Remove:
Front Master Cylinder [A] (see Front Master Cylinder Removal
in the Brakes chapter)
...
Commutator Cleaning and Inspection
Clean the metallic debris off the between commutator
segments [A].
NOTE
Do not use emery or sand paper on the commutator.
Check the commutator for damage or abnormal wear.
Replace the starter motor with a new one if there is any
damage or wear.
Visually inspect the commutato ...