
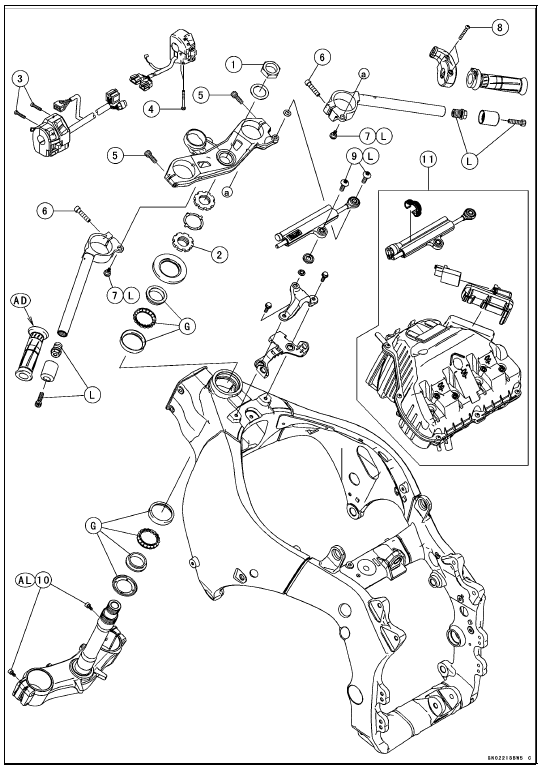
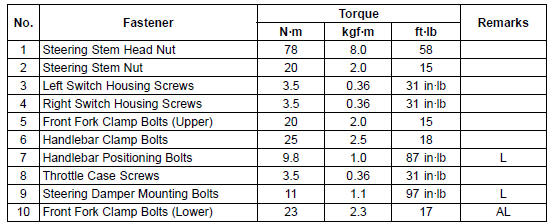
11. ZX1000JD/KD AD: Apply adhesive.
AL: Tighten the two clamp bolts alternately two times to ensure even tightening torque.
G: Apply grease.
L: Apply a non-permanent locking agent.
Specifications

 Steering
 Special Tools
Alternator Inspection
There are three types of alternator failures: short, open
(wire burned out), or loss in rotor magnetism. A short or
open in one of the coil wires will result in either a low output,
or no output at all. A loss in rotor magnetism, which may be
caused by dropping or hitting the alternator, by leav ...
DFI System Wiring Diagram (KIBS Equipped Models)
1. Air Intake Solenoid Valve (Other than US, CA and CAL Models)
2. Engine Stop Switch
3. Starter Button
4. Air Switching Valve
5. Stick Coil #1, #2, #3, #4
6. Spark Plugs
7. Intake Air Temperature Sensor
8. Crankshaft Sensor
9. Secondary Fuel Injector #1
10. Secondary Fuel Injector #2
...
Check 2-1: Speedometer Inspection
Using the suitable stand, raise the rear wheel off the
ground.
Rotate the rear wheel by hand or start the engine.
Check that the display changes speedometer.
If the display function does not work, check the following
parts.
Rear Wheel Rotation Sensor (see Wheel Rotation Sensor
Inspe ...