Kawasaki Ninja Owners Manual: Location of parts

Kawasaki Ninja Owners Manual / Location of parts

Location of parts


  1. Clutch Lever
  2. Left Handlebar Switches
  3. Rebound Damping Force Adjuster (Front Fork)
  4. Compression damping force adjuster (Front Fork)
  5. Meter Instruments
  6. Brake Fluid Reservoir (Front)
  7. Right Handlebar Switches
  8. Front Brake Lever
  9. Throttle Grip
  10. Ignition Switch/Steering Lock
  11. Electronic Steering Damper

Location of parts


  1. Headlight
  2. Air Cleaner Intake
  3. Turn Signal Lights
  4. Spark Plugs
  5. Air Cleaner
  6. Fuel Tank
  7. Rider’s Seat
  8. Seat Lock
  9. Passenger’s Seat
  10. Tail/Brake Light
  11. License Plate Light
  12. Brake Disc
  13. Spring Preload Adjuster
  14. Front Fork
  15. Brake Caliper
  16. Side Stand
  17. Shift Pedal
  18. Compression damping force adjusters
  19. Drive Chain
  20. Chain Adjuster
  21. Fuse Box

Location of parts


  1. Fuse Boxes
  2. Battery
  3. Rebound damping force adjuster
  4. Fuel Tank Cap
  5. Coolant Reserve Tank
  6. Muffler
  7. Swingarm
  8. Rear Shock Absorber
  9. Brake Fluid Reservoir (Rear)
  10. Rear Brake Pedal
  11. Rear Brake Light Switch
  12. Oil Level Inspection Window
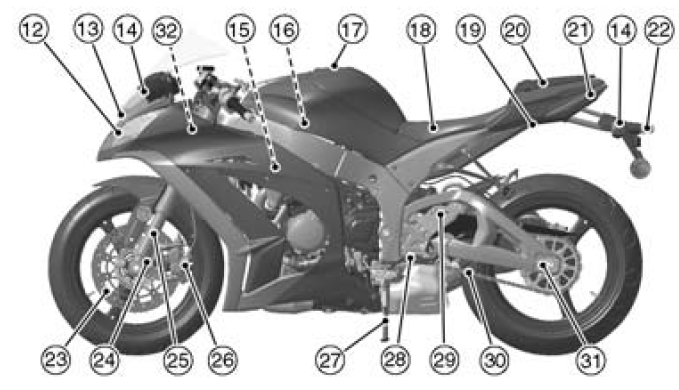
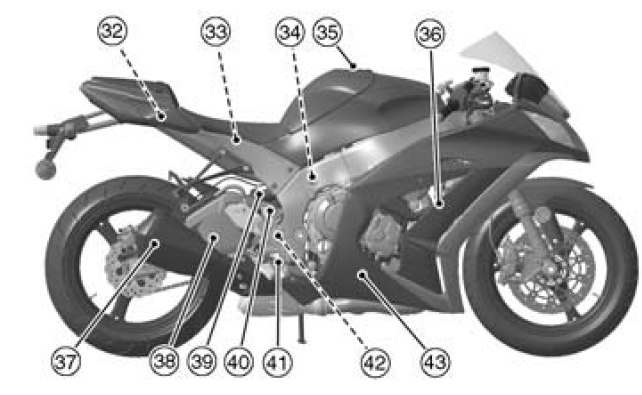
Serial number locations
The engine and frame serial numbers are used to register the motorcycle. They are the only means of identifying your particular machine from others of the same model type. These serial numbers m ...

Loading and accessories information
WARNINGIncorrect loading, improper installation or use of accessories, or modification of your motorcyclemay result in an unsafe riding condition. Before you ride the motorcycle, ...

Other materials:

Hub Bearing Removal
Remove the wheels (see Front/Rear Wheel Removal), and take out the following. Collars Coupling (Out of rear hub) Grease Seals Use the bearing remover to remove the hub bearings [A]. NOTICE Do not lay the wheel on the ground with the disc facing down. This can damage or warp the d ...

Exhaust Butterfly Valve Actuator Resistance Inspection
Turn the ignition switch to OFF. Disconnect the exhaust butterfly valve actuator lead connector (2 pins connector) [A]. Set the hand tester to the × 1 Ω range and connect it to the exhaust butterfly valve actuator connector. Special Tool - Hand Tester: 57001-1394 Measure ...

Fuel Pump Relay Inspection
Refer to the Relay Circuit Inspection in the Electrical System chapter. If the fuel pump relay is normal, check the wiring to the fuel pump relay (see Fuel Pump Relay Circuit). Special Tool - Hand Tester: 57001-1394 If the wiring is good, check the ECU for its ground and power supply (se ...