
A. PassengerŌĆÖs Seat
B. Projections
C. Holes
D. Tab
E. Slot
 RiderŌĆÖs Seat Installation
 Tool Kit
Flap and Rear Fender Rear Installation
Installation is the reverse of removal. Note the following.
Fit the tab [A] to the slot [B].
Run the seat lock cable [C] between the tool kit case and
the turn signal light as shown in the figure.
When installing the dampers [A] on the lower pipe [B],
install it as shown in the figure. ...
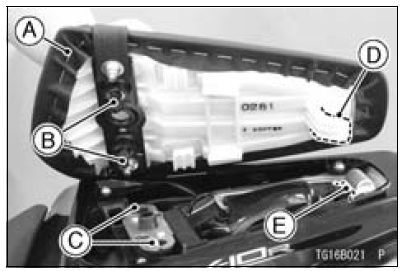
Fuse Box Fuse Removal
Remove the left upper inner fairing (see Upper Inner Fairing
Removal in the Frame chapter).
Unlock the hook [A] to take off the fuse box 1 [B].
Unlock the hook [C] to lift up the lid.
Pull the fuses [A] straight out of the fuse box 1 with needle
nose pliers.
Fuse Box 2
...
Swingarm Installation
Visually inspect the chain guide [A].
Replace the chain guide if it shows any signs of abnormal
wear or damage.
Apply a non-permanent locking agent to the threads of
the chain guide bolt [B].
Apply plenty of grease to the lip of the oil seals [A].
Be sure to install the oil seals ...