
The spring preload adjuster is located at the lower end of each front fork leg and can be adjusted.
A. Spring Preload Adjuster
B. Hexagon Wrench
Spring Preload Setting
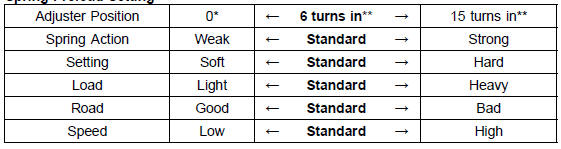
*: This position is the fully seated position (turned fully counterclockwise).
**: In from the fully seated position (turned fully counterclockwise). This adjustment range may not exactly match the number shown in the table due to small tolerance of production.
 Front Fork Inspection
 Compression Damping Force Adjuster and Rebound
Damping Force Adjuster Adjustment
Compression Damping Force Adjuster and Rebound
Damping Force Adjuster AdjustmentRear Wheel Installation
Apply high-temperature grease to the grease seal lips.
Fit the collars on the both sides of the hub.
Left Side Collar [A]
Right Side Collar [B] (with Flange)
Engage the drive chain with the rear sprocket.
Install the caliper bracket [A] onto the stopper [B] of the
swingarm.
...
Valve Guide Installation
Apply engine oil to the valve guide outer surface before
installation.
Heat the area around the valve guide hole to about 120
150°C (248 302°F).
NOTICE
Do not heat the cylinder head with a torch. This will
warp the cylinder head. Soak the cylinder head and
heat the oil.
Usin ...
Piston Ring Thickness Inspection
Measure the piston ring thickness.
Use the micrometer to measure at several points around
the ring.
Piston Ring Thickness
Standard:
Top [A] 0.77 0.79 mm (0.0303
0.0311 in.)
Second [B] 0.78 0.79 mm
(0.0307 0.0311 in.)
Service Limit:
Top 0.70 mm (0.0276 in.)
Second 0.71 mm (0.0280 ...