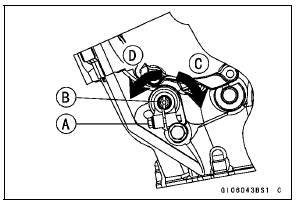

The amount of backlash can be changed by turning the balancer shaft which has eccentric journals.
Start the engine and let it idle.
Loosen the clamp bolt [A] and turn the balancer shaft [B] clockwise [C] until the balancer gear makes a whining sound.
Turn the shaft counterclockwise [D] until the balancer gear whining sound disappears and tighten the clamp bolt.
Torque - Balancer Shaft Clamp Bolt: 9.8 N·m (1.0 kgf·m, 87 in·lb)

 Balancer Installation
 Balancer Damper Inspection
Exploded View
10. US, CA, CAL and AU Models
11. ZX1000JD/KD
G: Apply grease.
L: Apply a non-permanent locking agent.
R: Replacement Parts
S: Follow the specified tightening sequence.
1. US, CA and CAL Models
2. ZX1000J Model
3. ZX1000K Model
4. AU Model
5. Face the large diameter side re ...
Torque Limiter Installation
Apply molybdenum disulfide grease to the torque limiter
shaft [A].
Install the torque limiter [B], the collar [C] and the shaft.
Turn the large-hole end of the shaft to inside as shown in
the figure.
Replace the washer [D] with a new one.
Apply a non-permanent locking agent to the t ...
Front Wheel Installation
NOTE
The direction of the wheel rotation [A] is shown by an
arrow [B] on the wheel spoke.
Check the wheel rotation mark on the front wheel and
install it.
Apply high-temperature grease to the grease seal lips.
Fit the collars [A] on the both sides of the hub.
The collars are i ...