
Measure the outside diameter [D] of the seating pattern on the valve seat.
If the outside diameter is too large or too small, repair the seat (see Valve Seat Repair).
Valve Seating Surface Outside Diameter Standard:
Exhaust 23.9  24.1 mm (0.941
 0.949 in.)
Intake 30.4  30.6 mm (1.197
 1.205 in.)
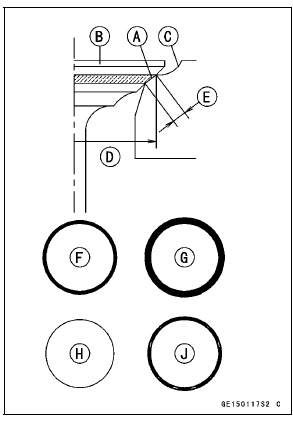
Measure the seat width [E] of the portion where there is no build-up carbon (white portion) of the valve seat with a vernier caliper.
Good [F]
If the width is too wide [G], too narrow [H] or uneven [J], repair the seat (see Valve Seat Repair).
Valve Seating Surface Width Standard:
Exhaust 0.8  1.2 mm (0.03
 0.05 in.)
Intake 0.5  1.0 mm (0.02
 0.04 in.)
 Valve-to-Guide Clearance Measurement (Wobble Method)
 Valve Seat Repair
Fuels Containing Oxygenates
Gasoline frequently contains oxygenates
(alcohols and ethers) especially
in areas of the U.S. and Canada
which are required to sell such reformulated
fuels as part of a strategy to
reduce exhaust emissions.
The types and volume of fuel oxygenates
approved for use in unleaded
gasoline by th ...
Model Identification
ZX1000JB (US and CA Models) Left Side View
ZX1000JB (US and CA Models) Right Side View
ZX1000JB (EUR Models) Left Side View
ZX1000JB (EUR Models) Right Side View
ZX1000KB (US and CA Models) Left Side View
ZX1000KB (US and CA Models) Right Side View
ZX1000KB (EUR Models) ...
Lubrication
Lubrication is necessary after riding
through rain or on wet roads, or any
time that the chain appears dry.
Use a lubricant for sealed chains to
prevent deterioration of chain seals. If
the chain is especially dirty, clean it
using a cleaner for sealed chains following
the instructions suppli ...