Kawasaki Ninja Owners Manual: Washing Your Motorcycle
- Rinse your bike with cold water from
a garden hose to remove any loose
dirt.
- Mix a mild neutral detergent (designed
for motorcycles or automobiles)
and water in a bucket. Use
a soft cloth or sponge to wash your
motorcycle. If needed, use a mild degreaser
to remove any oil or grease
which build up.
- After washing, rinse your motorcycle
thoroughly with clean water to remove
any residue (residue from the
detergent can damage parts of your
motorcycle).
- Use a soft cloth to dry your motorcycle.
As you dry, inspect your motorcycle
for chips and scratches. Do not
let the water air dry as this can damage
the painted surfaces.
- After cleaning your motorcycle,
check the rubber boot covering the
shift pedal ball joint for correct installation.
Be sure the sealing lip of the
rubber boot fits into the groove of the
ball joint.

A. Boots
- If the boot is damaged, replace it with
a new one. If the boot is not positioned
in the groove correctly, replace
it in the correct position.
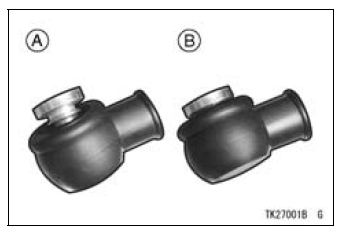
A. Wrongly set lip not in the correct position
B. Lip set correctly in the groove
- Start the engine and let it idle for several
minutes. The heat from the engine
will help dry moist areas.
- Carefully ride your motorcycle at a
slow speed and apply the brakes
several times. This helps the brakes
dry and restores its normal operating
performance
- Lubricate the drive chain to prevent
rusting.
NOTE
- After riding in an area where the
roads are salted or near the ocean,
immediately wash your motorcycle
with cold water. Do not use warm
water as it accelerates the chemical
reaction of the salt. After drying,
apply a corrosion protection spray
on all metal and chrome surfaces to
prevent corrosion.
- Condensationmay form on the inside
of the headlight lens after riding in the
rain, washing the motorcycle or humid
weather. To remove the moisture,
start the engine and turn on the
headlight. Gradually the condensation
on the inside of the lens will clear
off.
Semi-gloss Finish
To clean the semi-gloss finish;
- When washing the motorcycle, always
use a mild neutral detergent
and water.
- The semi-gloss finish effect may be
lost when the finish is excessively
rubbed.
- If any doubt, consult an authorized
Kawasaki dealer.
Frequent and proper care of your
Kawasaki motorcycle will enhance
its appearance, optimize overall performance,
and extend its useful life.
Covering your motorcycle with a high
quality, breatha ...
After washing use a soft cloth to
gently dry plastic parts. When dry,
treat the windshield, headlight lens,
and other nonpainted plastic parts with
an approved plastic cleaner/polisher
product.
...
Other materials:
Stick Coil Input Voltage Inspection
NOTE
Be sure the battery is fully charged.
Turn the ignition switch to OFF.
Remove the ECU (see ECU Removal in the Fuel System
(DFI) chapter).
Do not disconnect the ECU connectors.
Connect a digital meter [A] to the connector [B] with the
needle adapter set.
Special Tool - N ...
Crankshaft Side Clearance Inspection
Insert a thickness gauge [A] between the thrust washer
[B] on the crankcase and the crank web [C] at the #3 main
journal to determine clearance.
If the clearance exceeds the service limit, replace the
thrust washers as a set and check the width of the crankshaft
#3 main journal.
Cra ...
Keys
This motorcycle has a combination
key, which is used for the ignition
switch, steering lock, seat lock, and
fuel tank cap.
Included with the key is a key number,
which may be stamped on a separate
plate. Record the key number in
the space provided and store the number
in a safe place. If y ...

 General Precautions
 Windshield and Other Plastic Parts