
NOTICE
Never drop the air switching valve especially on a hard surface. Such a shock to the air switching valve can damaged it.
 Air Suction Valve Inspection
 Air Switching Valve Installation
Intake Air Temperature Sensor Output Voltage Inspection
NOTE
Be sure the battery is fully charged.
Turn the ignition switch to OFF.
Remove the fuel tank (see Fuel Tank Removal in the Fuel
System (DFI) chapter).
Disconnect the intake air temperature sensor connector
and connect the measuring adapter [A] between these
connectors as shown in ...
Fuel Hose Inspection (fuel leak, damage, installation condition)
If the motorcycle is not properly handled, the high pressure
inside the fuel line can cause fuel to leak [A] or the
hose to burst. Remove the fuel tank (see Fuel Tank Removal
in the Fuel System (DFI) chapter) and check the
fuel hoses.
Replace the fuel hose if any fraying, cracks [B] or ...
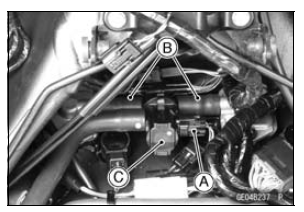
Intake Air Pressure Sensor #2 Removal
NOTICE
Never drop the intake air pressure sensor #2 especially
on a hard surface. Such a shock to the sensor
can damage it.
Remove:
Air Cleaner Housing (see Air Cleaner Housing Removal
in the Fuel System (DFI) chapter)
Intake Air Pressure Sensor #2 Connector [A]
Remove the intake air ...