
If the disc has worn past the service limit, replace it.
Measuring Area [B]
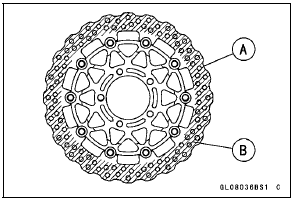
Brake Disc Thickness Standard:
Front 5.3  5.7 mm (0.21
 0.22 in.)
Rear 4.8  5.2 mm (0.19
 0.20 in.)
Service Limit:
Front 5.0 mm (0.20 in.)
Rear 4.5 mm (0.18 in.)
 Brake Disc Installation
 Brake Disc Warp Inspection
Intake Air Pressure Sensor #1 Installation
NOTE
The intake air pressure sensor #1 is the same part as
the intake air pressure sensor #2.
Installation is basically the reverse of removal.
Position the intake air pressure sensor #1 [A] between the
projections [B] on the rubber damper.
Install the rubber damper [A] on the bracket ...
Caliper Rubber Parts Replacement
Front Caliper Disassembly
Remove:
Front Caliper (see Front Caliper Removal in the Brakes
chapter)
Brake Pads (see Front Brake Pad Removal in the Brakes
chapter)
Remove:
Front Caliper Assembly Bolts [A]
Split the front caliper.
Remove:
Pad Spring
O-ring [A]
U ...
Rear Caliper Holder Shaft Wear
The caliper body must slide smoothly on the caliper holder
shafts [A]. If the body does not slide smoothly, one pad will
wear more than the other, pad wear will increase, and constant
drag on the disc will raise brake and brake fluid temperature.
Check to see that the caliper holder shafts ar ...