
NOTE
Do not use emery or sand paper on the commutator.
Replace the starter motor with a new one if there is any damage or wear.
Replace the starter motor with a new one if discoloration is noticed.
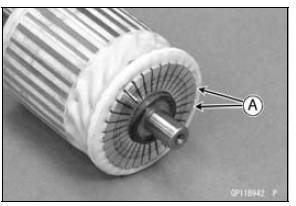
 Brush Inspection
 Armature Inspection
Coupling Bearing Installation
Replace the bearing with a new one.
Press in the bearing [A] until it is bottomed.
Special Tool - Bearing Driver Set [B]: 57001-1129
Pack the bearing with high-temperature grease.
Replace the circlip with a new one.
Special Tool - Inside Circlip Pliers: 57001-143
Replace the grease se ...
Front Caliper Removal
Remove:
Bolt [A]
Front Wheel Rotation Sensor [B]
Loosen the banjo bolt [C] at the brake hose lower end,
and tighten it loosely.
Unscrew the caliper mounting bolts [D], and detach the
caliper [E] from the disc.
NOTICE
Do not loosen the caliper assembly bolts [F]. Take
out only ...
CAL and SEA-B1 Models
1. Green Hose (Purge)
2. Clamp (hold the white hose.)
3. Canister
4. White Hose (Vacuum)
5. Blue Hose (Breather)
6. Red Hose (Return)
7. Separator
8. Quick Rivet
9. Face the hook portion of the bracket to inside of the vehicle.
10. Clamp (Bend down the clamp, and hold the blue hose, the ...