
NOTICE
Immediately wash away any brake fluid that spills.
NOTE
If the caliper is to be disassembled after removal and if compressed air is not available, disassemble the caliper before the brake hose is removed (see Caliper Rubber Parts Replacement in the Periodic Maintenance chapter).
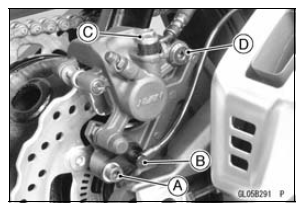
 Front Caliper Removal
 Caliper Installation
Special Tools
Inside Circlip Pliers:
57001-143
Oil Seal & Bearing Remover:
57001-1058
Bearing Driver Set:
57001-1129
Jack:
57001-1238
Bearing Remover Head, 15 ×
17:
57001-1267
Fork Oil Level Gauge:
57001-1290
Bearing Remover Shaft, 13:
57001-1377
Fork Oil Seal Driver, 43:
57001-15 ...
Technical Information-Power Mode
The rider can choose from three engine power modes to suit their preferences
and road conditions.
The FI ECU controls the engine power by adjusting fuel injection, air intake,
and ignition timing. It
enables three-mode selection: Full Power (Mode F), Middle Power (Mode M), and
Low Power (M ...
KIBS Hydraulic Unit Inspection
Remove the KIBS hydraulic unit (see KIBS Hydraulic Unit
Removal).
Visually inspect the connector terminals [A].
Replace the KIBS hydraulic unit or main harness if either
of the terminals are cracked, bent, or otherwise damaged.
If the KIBS hydraulic unit connector is clogged with mud
or ...