
Put a plank onto the suitable stand for engine balance.
Support the engine until all bolts have been tightened.
First, install and tighten the following bolts temporarily.
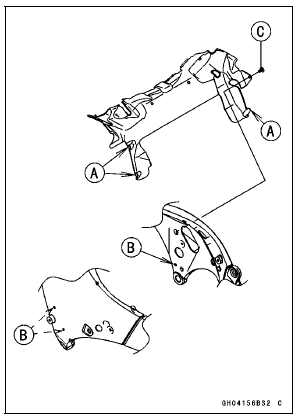
Middle Engine Mounting Bolt [A] Lower Engine Mounting Bolt [B] Left Front Engine Mounting Bolt [C] Right Front Engine Mounting Bolt [D]
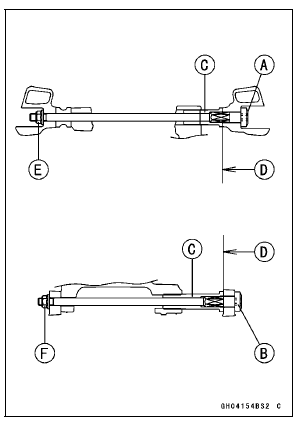
Second, tighten the left front engine mounting bolt [A].
Frame [B] Engine [C] Torque - Left Front Engine Mounting Bolt: 44 N·m (4.5 kgf·m, 32 ft·lb)
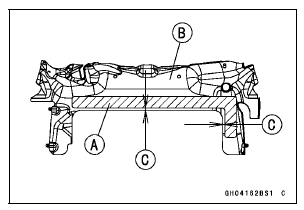
Third, insert the middle [A] and lower [B] engine mounting bolts to the adjusting collars [C], and tighten the bolts counterclockwise.
NOTE
Tighten the bolts until the clearance [D] between the frame and collar come to 0 mm (0 in.).
Torque - Middle Engine Mounting Bolt: 9.8 N·m (1.0 kgf·m, 87 in·lb) Lower Engine Mounting Bolt: 9.8 N·m (1.0 kgf·m, 87 in·lb)
Fourth, tighten the middle [E] and lower [F] engine mounting nuts.
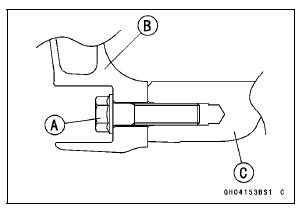
Fifth, remove the right front engine mounting bolt [A].
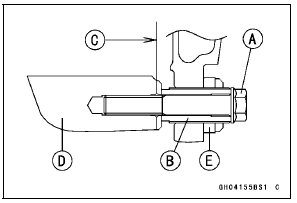
Sixth, tighten the adjusting collar [B] clockwise by hand until the clearance [C] between the engine [D] and collar come to 0 mm (0 in.).
Seventh, tighten the adjusting collar locknut [E].
Special Tool - Engine Mount Nut Wrench: 57001-1450
Torque - Adjusting Collar Locknut: 49 N·m (5.0 kgf·m, 36 ft·lb)
Lastly, tighten the right front engine mounting bolt.
Torque - Right Front Engine Mounting Bolt: 44 N·m (4.5 kgf·m, 32 ft·lb)
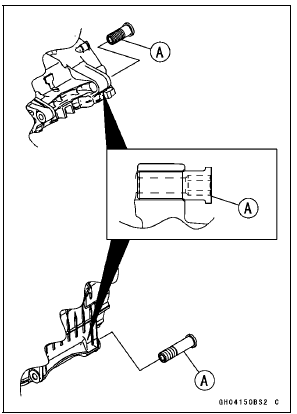
Check that the pad [A] is in place on the heat insulation plate [B].
5 mm (0.20 in.) [C]
Insert the projections [A] into the holes [B].
Apply a non-permanent locking agent to the threads of the heat insulation plate bolt [C] and tighten it.
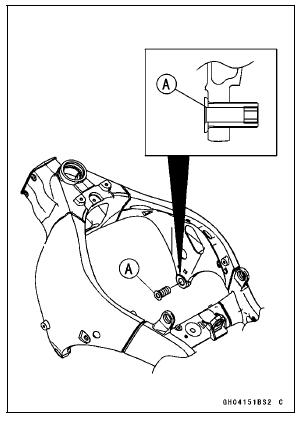
 Engine Removal
Steering Damper Oil Leak Inspection
Visually inspect the steering damper [A] for oil leakage.
If the oil leakage is found on it, replace the steering
damper with a new one (see Steering Damper Removal/
Installation in the Steering chapter).
ZX1000JD/KD [B]
...
Exhaust Butterfly Valve Cable Removal
Remove the fuel tank (see Fuel Tank Removal in the Fuel
System (DFI) chapter).
Open the clamp [A] and free the cables.
Slide the dust covers [B].
Loosen the locknuts [A], and turn the adjusters [B] to give
the cable plenty of play.
Remove the clamp [A].
Remove the up ...
Swingarm Bearing, Sleeve Inspection
NOTICE
Do not remove the bearings for inspection. Removal
may damage them.
Inspect the needle bearings [A] and ball bearing installed
in the swingarm.
The rollers and ball in a bearing normally wear very little,
and wear is difficult to measure. Instead of measuring,
visually inspec ...
