
NOTE
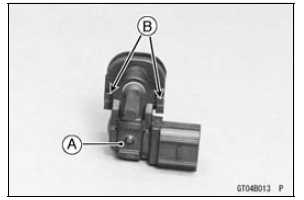
The intake air pressure sensor #2 is the same part as the intake air pressure sensor #1.
Position the intake air pressure sensor #2 [A] between the projections [B] on the rubber damper.
 Intake Air Pressure Sensor #2 Removal
 Intake Air Pressure Sensor #2 Input Voltage Inspection
Front Wheel Rotation Sensor Wiring Inspection (Service Code b 43)
Disconnect the front wheel rotation sensor lead connector
[A] (see Front Wheel Rotation Sensor Removal in the
Brakes chapter).
Disconnect the KIBS hydraulic unit lead connector (see
KIBS Hydraulic Unit Removal in the Brakes chapter).
Check the wiring continuity of the W lead and ...
Cylinder Head Warp Inspection
Clean the cylinder head.
Lay a straightedge across the lower surface of the cylinder
head at several positions.
Use a thickness gauge [A] to measure the space between
the straightedge [B] and the head.
Cylinder Head Warp
Standard: – – –
Service Limit: 0.05 mm (0.0020 in.)
...
Rear Wheel Rotation Sensor Signal (Service Code 24)
Rear Wheel Rotation Sensor Signal Inspection
The rear wheel rotation sensor sends the signal to the
ECU through the KIBS hydraulic unit (KIBS equipped
models). For other than KIBS equipped models, the
signal is sent directly to the ECU.
The ECU uses the rear wheel rotation sensor signal for
mo ...