
If the radiator fan relay is normal, check the wiring for continuity, using the wiring diagram in this section.
Special Tool - Hand Tester: 57001-1394
If the wiring is good, check the ECU for its ground and power supply (see ECU Power Supply Inspection in the Fuel System (DFI) chapter).
If the ground and power supply are good, replace the ECU (see ECU Removal/Installation in the Fuel System (DFI) chapter).
Radiator Fan Circuit
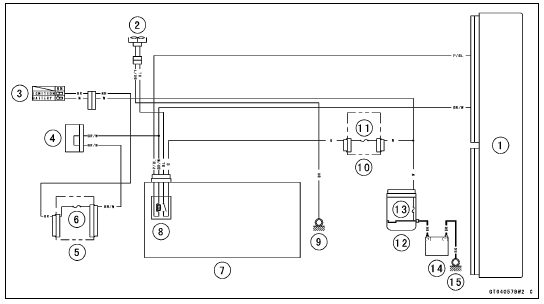
1. ECU
2. Fan Motor
3. Ignition Switch
4. Joint Connector F
5. Fuse Box 1
6. Ignition Fuse 15 A
7. Relay Box
8. Fan Relay
9. Frame Ground 3
10. Fuse Box 2
11. Fan Fuse 15 A
12. Starter Relay
13. Main Fuse 30 A
14. Battery
15. Engine Ground
 Radiator Fan Relay Removal/Installation
Exploded View
10. US, CA, CAL and AU Models
11. ZX1000JD/KD
G: Apply grease.
L: Apply a non-permanent locking agent.
R: Replacement Parts
S: Follow the specified tightening sequence.
1. US, CA and CAL Models
2. ZX1000J Model
3. ZX1000K Model
4. AU Model
5. Face the large diameter side re ...
Tire Tread Wear Inspection
As the tire tread wears down, the tire becomes more susceptible
to puncture and failure. An accepted estimate is
that 90% of all tire failures occur during the last 10% of tread
life (90% worn). So it is false economy and unsafe to use
the tires until they are bald.
Measure the tread depth a ...
Oil Pump Drive Gear Shaft Installation
Apply molybdenum disulfide grease [A] to the oil pump
drive gear shaft.
Apply molybdenum disulfide oil solution to the followings.
Transmission Case [B]
Crankcase [C]
Install the oil pump drive gear shaft and washer [D] as
shown in the figure.
Install the new circlip [E] into the ...
