Kawasaki Ninja Service Manual: Service Code Reading
The service code(s) is displayed on the LCD by the number
of two digits.
NOTE
- The service code of the KIBS and ABS adds “b” at the
left side of the code.
- The service code of the ESD adds “E” at the left side of
the code.
- When there are a number of problems, all the service
codes can be stored and the display will begin starting
from the lowest number service code in the numerical order.
- Then after completing all codes, the display is repeated
until the ignition switch is turned to OFF or upper button
and lower button are pushed for more than two seconds.
- The order of the system’s appearing is the order of
DFI System, Immobilizer System (equipped models),
S-KTRC System, KIBS and ABS (equipped models), and
ESD System (ZX1000JD/KD).
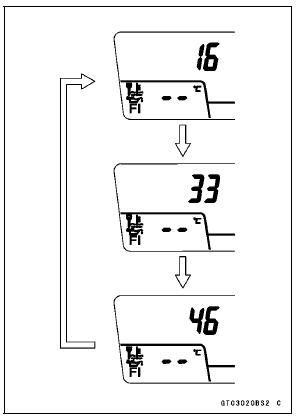
- For example, if three problems occurred in the order of
46, 16, 33, the service codes are displayed (each two
seconds) from the lowest number in the order listed as
shown below.
(16 → 33 → 46) → (16 → 33 → 46) → → ¬∑¬∑¬∑¬∑¬∑ (repeated)
- If the no problem or when the repair has been done, warning
indicator light (LED) and warning symbol go off and
service code is not displayed.
NOTE
Use a fully charged battery when conducting
self-diagnosis. Otherwise, the light (LED) and symbol
do not light or blink.
Turn the ignition switch to ON.
When a problem occurs with D ...
When repair has been done, warning indicator light (LED) and warning symbol
go off and service
code are not displayed.
But the service codes stored in memory of the ECU are not erased to preserve ...
Other materials:
Chassis Parts Lubrication
Before lubricating each part, clean off any rusty spots with
rust remover and wipe off any grease, oil, dirt, or grime.
Lubricate the points listed below with indicated lubricant.
NOTE
Whenever the vehicle has been operated under
wet or rainy conditions, or especially after using a
high ...
Oil Pressure Relief Valve Inspection
Remove the oil pressure relief valve (see Oil Pressure
Relief Valve Removal).
Check to see if the valve [A] slides smoothly when pushing
it in with a wooden or other soft rod, and see if it comes
back to its seat by spring [B] pressure.
NOTE
Inspect the valve in its assembled stat ...
Cylinder Head Warp Inspection
Clean the cylinder head.
Lay a straightedge across the lower surface of the cylinder
head at several positions.
Use a thickness gauge [A] to measure the space between
the straightedge [B] and the head.
Cylinder Head Warp
Standard: – – –
Service Limit: 0.05 mm (0.0020 in.)
...

 Self-Diagnosis Procedures
 Service Code Erasing