
When repair has been done, warning indicator light (LED) and warning symbol go off and service code are not displayed.
But the service codes stored in memory of the ECU are not erased to preserve the problem history.
In this model, the problem history can not be erased. However, the memories of the KIBS and ABS system service codes can be erased using the KDS 3 version kit.
The service codes of the immobilizer, KIBS and ABS, and ESD systems appear to each system equipped models.

Notes:
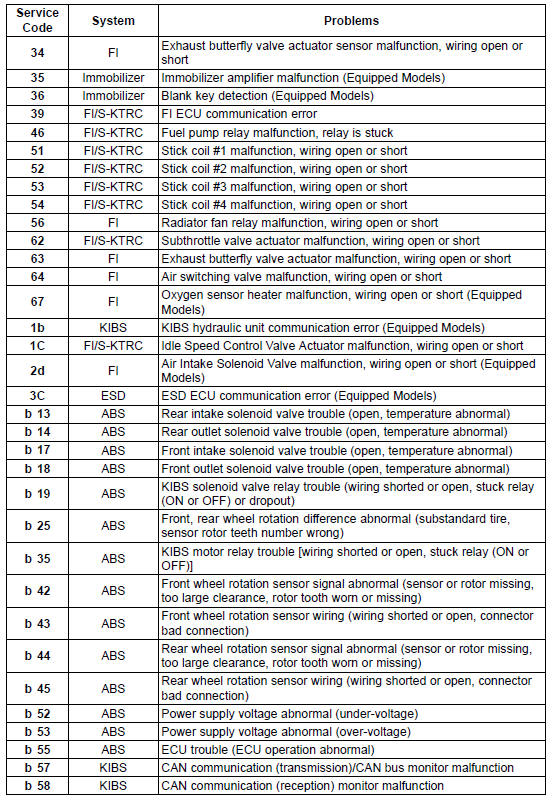
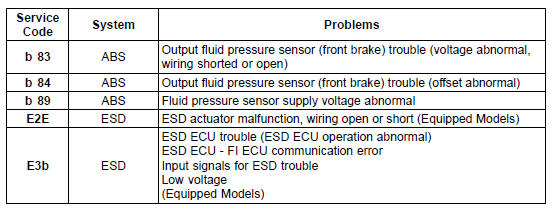
 Service Code Reading
 Backups
Front Fork Inspection
Holding the brake lever, pump the
front fork up and down several times
to inspect smooth stroke.
Visually inspect the front fork for oil
leakage, scoring or scratches on the
outer surface of the inner tube.
If any doubt about the front fork, it
should be checked by an authorized
K ...
Compression Damping Force Adjustment
The compression damping force adjusters
for high and low speeds are located
on the gas reservoir at the left
side of the rear shock absorber.
A. High Speed Adjuster
B. Low Speed Adjuster
NOTE
Turning the high speed adjuster has
the low speed adjuster turning. Although
the low speed adju ...
Battery Maintenance
It is the owner’s responsibility to keep
the battery fully charged. Failure to do
so can lead to battery failure and leave
you stranded.
If you are riding your vehicle infrequently,
inspect the battery voltage
weekly using a voltmeter. If it drops
below 12.8 volts, the battery should be
...