
90° [A]
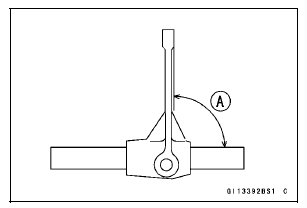
 Shift Drum Assembly
 Shift Fork/Gear Groove Wear Inspection
ESD (Electronic Steering Damper) ECU Error (Service Code E3b, ZX1000JD/KD)
If this service code appears, check that the following parts
are correctly.
Crankshaft Sensor
Gear Position Switch
Starter Lockout Switch
Main Throttle Sensor
Rear Wheel Rotation Sensor
If these parts are normal, check the ESD ECU for its
ground and power supply (see ESD ECU Power Supply
...
Seat Cover Removal
Remove:
Rear Seat (see Rear Seat Removal)
Remove the bolts [A].
Remove the upper seat cover backward [B] to clear the
hook portions.
Remove:
Front Seat (see Front Seat Removal)
Quick Rivets [A]
Bolts [B]
Seat Covers [C]
...
Fuel Hose Replacement
Remove the fuel tank (see Fuel Tank Removal in the Fuel
System (DFI) chapter).
WARNINGFuel is flammable and explosive under
certain conditions
and can cause severe burns. Be prepared
for fuel spillage; any spilled fuel must be completely
wiped up immediately. When the fue ...