
When either the front or rear brake is applied, the brake light goes on. The front brake light switch requires no adjustment, but the rear brake light switch should be adjusted in accordance with the Periodic Maintenance Chart.
Inspection
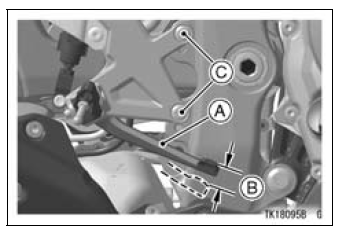
A. Brake Pedal
B. 10 mm (0.4 in.)
C. Bolts
Brake Pedal Travel

Adjustment
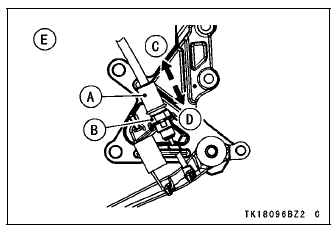
A. Rear Brake Light Switch
B. Adjusting Nut
C. Lights sooner
D. Lights later
E. Viewed from behind the bracket
NOTICE
To avoid damaging the electrical connections inside the switch, be sure that the switch body does not turn during adjustment.
NOTE
Install the front footpegs with same height on both sides. Refer to the Front Footpeg Position in General Information chapter.
 Front and Rear Brakes
 Electronic Steering Damper
Brake Disc Warp Inspection
Raise the wheel off the ground with the jack.
Special Tools - Jack: 57001-1238
Jack Attachment: 57001-1608
For front disc inspection, turn the handlebar fully to one
side.
Set up a dial gauge against the disc [A] as shown in
the figure and measure disc runout, while turning [B] the
...
Fuel Reserve Switch Inspection
Fill the fuel tank with fuel and close the fuel tank cap.
Remove the front seat (see Front Seat Removal in the
Frame chapter).
Disconnect the fuel pump lead connector [A].
Connect the test light [A] (12 V 3.4 W bulb in a socket
with leads) and the 12 V battery [B] to the fuel pu ...
Oil Level Inspection
Check that the engine oil level is between the upper [A]
and lower [B] levels in the gauge.
NOTE
Situate the motorcycle so that it is perpendicular to the
ground.
If the motorcycle has just been used, wait several minutes
for all the oil to drain down.
If the oil has just been changed, ...