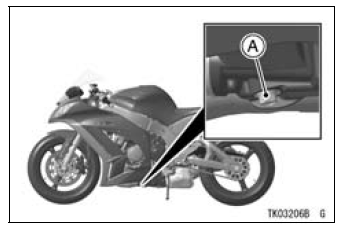


A. Engine Oil Drain Bolt

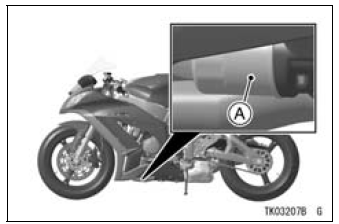
A. Oil Filter
| WARNING Engine oil is a toxic substance. Dispose of used oil properly. Contact your local authorities for approved disposal methods or possible recycling. |
Tightening Torque
Engine Oil Drain Bolt: 29 N·m (3.0 kgf·m, 21 ft·lb) Oil Filter: 17 N·m (1.7 kgf·m, 13 ft·lb)
Recommended Engine Oil
Type: Kawasaki Performance 4-Stroke Motorcycle Oil* Kawasaki Performance 4-Stroke Semi-Synthetic Oil* Kawasaki Performance 4-Stroke Full Synthetic Oil* or other 4-stroke oils with API SG, SH, SJ, SL, SM and JASO MA, MA1, MA2 rating Viscosity: SAE10W-40
*Kawasaki Performance Oils and Lubricants have been specifically engineered for your vehicle. Consistent use of these products meets or exceeds warranty and service requirements and can help to extend the life of your Kawasaki.
NOTE
Do not add any chemical additive to the oil. Oils fulfilling the above requirements are fully formulated and provide adequate lubrication for both the engine and the clutch.
Engine Oil Capacity
Capacity: 2.9 L (3.1 US qt) [when filter is not removed] 3.3 L (3.5 US qt) [when filter is removed] 3.7 L (3.9 US qt) [when engine is completely dry]
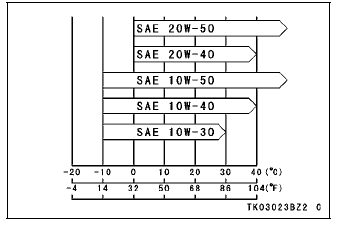
Although 10W-40 engine oil is the recommended oil for most conditions, the oil viscosity may need to be changed to accommodate atmospheric conditions in your riding area.

 Oil Level Inspection
 Cooling System
KIBS Troubleshooting Outline
When an abnormality in the system occurs, the ABS indicator
light (LED) and KIBS indicator light (LED) light up and
the KIBS warning symbol are displayed on the LCD (Liquid
Crystal Display) to alert the rider. In addition, the nature of
the fault is stored in the memory of the KIBS hydraulic uni ...
KIBS Hydraulic Unit Communication Error (Service Code 1b, KIBS Equipped
Models)
KIBS Hydraulic Unit Communication Line Inspection
When the data (for status of KIBS hydraulic unit) is not
sent from the KIBS hydraulic unit to the meter unit and
ECU, the service code 1b is displayed.
The data is sent through the CAN communication line.
The service code 1b is detected with the ...
Coolant Change
WARNINGCoolant can be extremely hot and cause
severe
burns, is toxic and very slippery. Do not remove
the radiator cap or attempt to change the coolant
when the engine is hot; allow it cool completely.
Immediately wipe any spilled coolant from tires,
frame, engine or othe ...