
NOTICE
Racing the engine before the oil reaches every part can cause engine seizure.

A. Oil Level Inspection Window
B. Oil Filler Cap
C. Lower Level Line
D. Upper Level Line
NOTICE
If the engine oil gets extremely
low or if the oil pump does not
function properly or oil passages
are clogged, the warning
indicator light in the meter instrument
and oil pressure warning
symbol ( 
) in the multifunction
meter will go on. If they
go on when the engine speed is
above idle, stop the engine immediately
and have it serviced.
Failure to do so could cause serious engine damage.
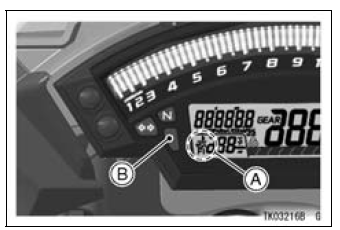
A. Oil Pressure Warning Symbol (
 )
)
B. Warning Indicator Light (Red)
 Engine Oil
 Oil and/or Oil Filter Change
Crankshaft Installation
NOTE
If the crankshaft is replaced with a new one, refer to
the Connecting Rod Big End Bearing/Crankshaft Main
Bearing Insert Selection in the Specifications.
NOTICE
If the crankshaft, bearing inserts, or crankcase
halves are replaced with new ones, select the bearing
inserts and check cleara ...
Torque Limiter Installation
Apply molybdenum disulfide grease to the torque limiter
shaft [A].
Install the torque limiter [B], the collar [C] and the shaft.
Turn the large-hole end of the shaft to inside as shown in
the figure.
Replace the washer [D] with a new one.
Apply a non-permanent locking agent to the t ...
Oxygen Sensor Removal (Equipped Models)
Remove:
Fuel Tank (see Fuel Tank Removal in the Fuel System
(DFI) chapter)
Right Lower Fairing (see Lower Fairing Removal in the
Frame chapter)
Disconnect the oxygen sensor lead connector [A].
NOTICE
Do not pull strongly, twist, or bend the oxygen sensor
lead. This may cause the wi ...