
| WARNING Gasoline is extremely flammable and can be explosive under certain conditions, creating the potential for serious burns. Make sure the area is well-ventilated and free from any source of flame or sparks; this includes any appliance with a pilot light. Do not smoke. Turn the ignition switch OFF. Disconnect the battery (–) terminal. To avoid fuel spills, draw it from the tank when the engine is cold. Be prepared for fuel spillage; any spilled fuel must be completely wiped up immediately. |
During tank removal, keep the tank cap open to release pressure in the tank. This makes fuel spillage less.

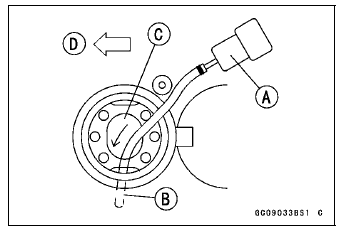
Use a soft plastic hose [B] as a pump intake hose in order to insert the hose smoothly.
Put the hose through the fill opening [C] into the tank and draw the fuel out.
Front [D]
| WARNING Spilled fuel is flammable and can be explosive under certain conditions. The fuel can not be removed completely from the fuel tank. Be careful for remained fuel spillage. |
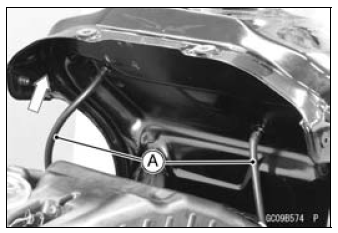
Clear the hook fastener [C], projections [D] and hook portion [E].
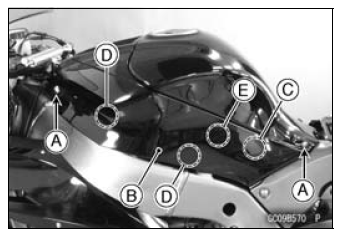
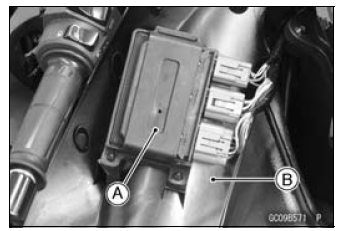
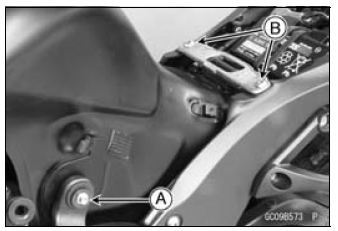
Remove the relay box [A] from the left fuel tank cover [B].
Clear the projections [C] from the holes.
Fuel Return Hose
When removing with standard tip screwdriver
When removing with fingers
NOTICE
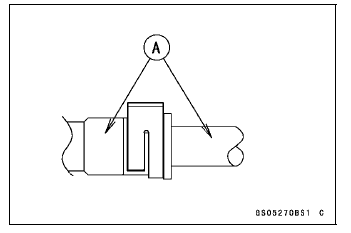
Prying or excessively widening the joint lock ends for fuel hose removal will permanently deform the joint lock, resulting in a loose or incomplete lock that may allow fuel to leak and create the potential for a fire explosion. To prevent fire or explosion from a damaged joint lock, do not pry or excessively widen the joint lock ends when removing the fuel hose. The joint lock has a retaining edge that locks around the housing.
| WARNING Fuel is flammable and explosive under certain conditions and can cause severe burns. Be prepared for fuel spillage; any spilled fuel must be completely wiped up immediately. When the fuel hose is disconnected, fuel spills out from the hose and the pipe. Cover the hose connection with a clean shop towel to prevent fuel spillage. |
Do not apply the load to the fuel outlet pipe of the fuel pump.
NOTICE
For the California and Southeast Asia models, if gasoline, solvent, water or any other liquid enters the canister, the canister’s vapor absorbing capacity is greatly reduced. If the canister does become contaminated, replace it with a new one.
Be sure to plug the evaporative fuel return hose to prevent fuel spilling before fuel tank removal.
| WARNING Spilled fuel is flammable and can be explosive under certain conditions. For California and Southeast Asia models, be careful not to spill fuel through the return hose. |
If liquid or gasoline flows into the breather hose, remove the hose and blow it clean with compressed air.
Be careful of fuel spillage from the fuel tank since fuel still remains in the fuel tank and fuel pump.
| WARNING Gasoline is extremely flammable and can be explosive under certain conditions, creating the potential for serious burns. Store the fuel tank in an area which is well-ventilated and free from any source of flame or sparks. Do not smoke in this area. Place the fuel tank on a flat surface and plug the fuel pipes to prevent fuel leakage. |
 Fuel Tank
 Fuel Tank Installation
Vehicle-down Sensor Input Voltage Inspection
NOTE
Be sure the battery is fully charged.
Turn the ignition switch to OFF.
Disconnect the vehicle-down sensor connector and connect
the measuring adapter [A] between these connectors
as shown in the figure.
Main Harness [B]
Vehicle-down Sensor [C]
Special Tool - Measuring Adapte ...
Swingarm Removal
Remove:
Rear Wheel (see Rear Wheel Removal in the
Wheels/Tires chapter)
Mud Guard with Rear Brake Hose (see Mud Guard Removal
in the Frame chapter)
Rocker Arm (see Rocker Arm Removal)
Remove:
Brake Hose Clamp Bolt [A]
Unscrew the swingarm pivot shaft nut [A].
Usi ...
Self-Diagnosis Outline
The self-diagnosis system is monitoring the following
mechanisms.
DFI System and Ignition System
S-KTRC System
Immobilizer System (Equipped Models)
KIBS and ABS (Equipped Models)
ESD (Electronic Steering Damper) System
(ZX1000JD/KD)
The following warning indicator lights (LED) are used for ...