
The compression damping force adjusters for high and low speeds are located on the gas reservoir at the left side of the rear shock absorber.
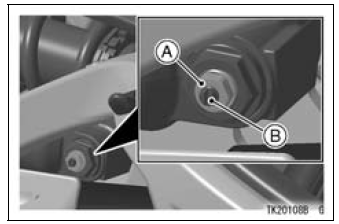
A. High Speed Adjuster
B. Low Speed Adjuster
NOTE
Turning the high speed adjuster has the low speed adjuster turning. Although the low speed adjuster turns with the high speed adjuster when turning the high speed adjuster, the low speed adjuster setting position dose not change.
Low Speed Compression Damping Adjustment
 Rebound Damping Force Adjustment
 High Speed Compression Damping Adjustment
Muffler Body Installation
Replace the muffler body gasket [A] with a new one.
Install the muffler body gasket to the premuffler chamber
[B] until it is bottomed so that the chamfer side faces premuffler
chamber.
Install the muffler body clamp [C] as shown in the figure.
Insert the projection [D] into the slot [ ...
Rider’s Seat Installation
Insert the tabs on the front of the
rider’s seat into the slots in the frame
and secure the seat with mounting
bolts.
Install the seat cover and bolts.
A. Rider’s Seat
B. Tabs
C. Slots
D. Stays ...
Service Code Erasing
When repair has been done, warning indicator light (LED) and warning symbol
go off and service
code are not displayed.
But the service codes stored in memory of the ECU are not erased to preserve
the problem history.
In this model, the problem history can not be erased. However, the memorie ...