
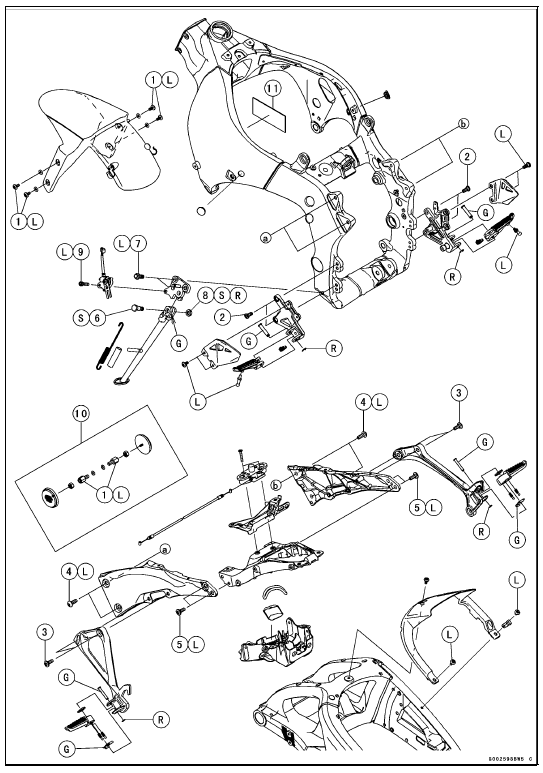
10. US, CA, CAL and AU Models 11. ZX1000JD/KD G: Apply grease.
L: Apply a non-permanent locking agent.
R: Replacement Parts S: Follow the specified tightening sequence.
1. US, CA and CAL Models
2. ZX1000J Model
3. ZX1000K Model
4. AU Model
5. Face the large diameter side rearward.
L: Apply a non-permanent locking agent.
R. Replacement Parts

 Frame
Frame Seats
SeatsSpecifications
Whenever you see the symbols
shown below, heed their instructions!
Always follow safe operating and maintenance
practices.
DANGER
DANGER indicates a hazardous
situation which, if not avoided,
will result in death or serious injury.
WARNINGWARNING indicates a hazardous
situation whi ...
Water Pump Housing Disassembly
NOTICE
Do not damage the hole wall of the water pump
housing.
Insert a bar [A] into the pump housing [B], and hammer
evenly around the circumference of the mechanical seal
bottom [C].
Take the oil seal [A] out of the housing [B] with a hook [C].
...
Stator Coil Installation
Apply a non-permanent locking agent to the threads of
the stator coil bolts and tighten them.
Torque - Stator Coil Bolts: 12 N·m (1.2 kgf·m, 106 in·lb)
Using a high flash-point solvent, clean off any oil or dirt
that may be on the silicone sealant coating area. Dry
them with a clea ...