
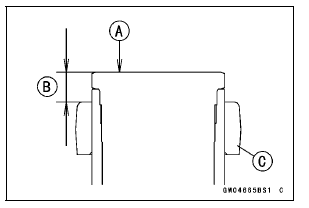
11 mm (0.43 in.) [B] Steering Stem Head [C]
NOTE
Tighten the two lower front fork clamp bolts alternately two times to ensure even tightening torque.
NOTE
Formula: a × b ÷ (b + c) = d
[a] Specified torque
[b] Length from center of square hole to grip point
[c] Offset = 44 mm
[d] Tightening torque

For an example: 35 N·m × 310 ÷ (310 + 44) = 31 N·m
Tighten: Torque - Front Fork Clamp Bolts (Upper): 20 N·m (2.0 kgf·m, 15 ft·lb) Handlebar Clamp Bolts: 25 N·m (2.5 kgf·m, 18 ft·lb)
 Front Fork Removal (Each Fork Leg)
 Front Fork Oil Change
City Light (LED) Removal/Installation
Remove:
Upper Fairing Assembly (see Upper Faring Assembly
Removal in the Frame chapter)
Headlight (see Headlight Removal)
Remove the screws [A], and take the city light [B] off the
upper fairing assembly.
Installation is the reverse of removal. Note the following.
When inst ...
Water Pump Inspection
Remove the left lower fairing (see Lower Fairing Removal
in the Frame chapter).
Check the drainage outlet passage [A] at the bottom of
the water pump body for coolant leaks.
If the mechanical seal is damaged, the coolant leaks
through the seal and drains through the passage. Replace
th ...
Rear Shock Absorber Installation
Replace the rear shock absorber nuts and tie-rod nuts
with new ones.
Tighten:
Torque - Rear Shock Absorber Nuts: 34 N·m (3.5 kgf·m, 25
ft·lb)
Tie-Rod Nuts: 34 N·m (3.5 kgf·m, 25 ft·lb)
When installing the rear shock absorber bracket [A], install
it so that the recess side [B] ...