
Replace the fuel hose if any fraying, cracks [B] or bulges [C] are noticed.
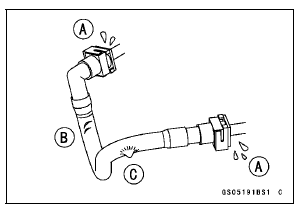
Replace the hose if it has been sharply bent or kinked.
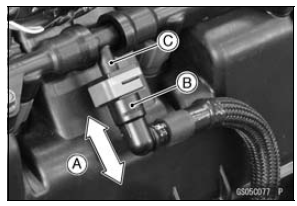
Push and pull [A] the fuel hose joint [B] back and forth more than two times, and make sure it is locked.
Check the other hose joint in the same way.
NOTICE
When pushing and pulling the fuel hose joint, do not apply strong force to the delivery pipe [C] on the nozzle assy. The pipe made from resin could be damaged.
| WARNING Leaking fuel can cause a fire or explosion resulting in serious burns. Make sure the hose joint is installed correctly on the delivery pipe by sliding the joint. |
If it does not locked, reinstall the hose joint.
 Idle Speed Inspection
 Evaporative Emission Control System Inspection (CAL and SEA-B1 Models)
Oil Cooler Installation
Replace the O-ring [A] with a new one.
Apply grease to the new O-ring.
Install the water hoses and hose clamps [A] as shown in
the figure.
Water Hose (About 300 mm, 11.8 in.) [B]
Water Hose (About 130 mm, 5.1 in.) [C]
Yellow Paint [D]
Tighten:
Torque - Water Hose Clamp S ...
DFI System Troubleshooting Guide
NOTE
This is not an exhaustive list, giving every possible cause for each
problem listed. It is meant
simply as a rough guide to assist the troubleshooting for some of the more
common difficulties in
DFI system.
The ECU may be involved in the DFI electrical and ignition system
tro ...
Coupling Bearing Removal
Remove:
Coupling
Grease Seal
Circlip [A]
Special Tool - Inside Circlip Pliers: 57001-143
Remove the bearing [A] by tapping from the wheel side.
Special Tool - Bearing Driver Set [B]: 57001-1129
...