
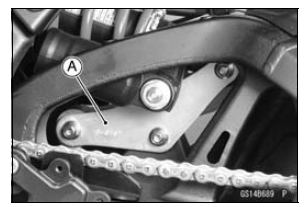
If the rocker arm [A] does not smoothly stroke or noise is found, inspect the fasteners and bearings (see Tie-Rod/Rocker Arm Bearing, Sleeve Inspection in the Suspension chapter).
In this photo, the foot guard has been removed for clarity.
 Front Forks/Rear Shock Absorber Operation Inspection
 Tie-Rod Operation Inspection
Liquid Gasket, Non-permanent Locking Agent
For applications that require Liquid Gasket or a
Non-permanent Locking Agent, clean the surfaces so
that no oil residue remains before applying liquid gasket or
non-permanent locking agent. Do not apply them excessively.
Excessive application can clog oil passages and
cause serious damage.
...
Air Intake Solenoid Valve (Service Code 2d, Equipped Models)
Air Intake Solenoid Valve Removal/Installation
Refer to the Air Intake Solenoid Valve Removal/Installation
in the Fuel System (DFI) chapter.
Air Intake Solenoid Valve Inspection
Refer to the Air Intake Solenoid Valve Unit Test in the
Electrical System chapter.
If the air intake ...
Swingarm Removal
Remove:
Rear Wheel (see Rear Wheel Removal in the
Wheels/Tires chapter)
Mud Guard with Rear Brake Hose (see Mud Guard Removal
in the Frame chapter)
Rocker Arm (see Rocker Arm Removal)
Remove:
Brake Hose Clamp Bolt [A]
Unscrew the swingarm pivot shaft nut [A].
Usi ...