
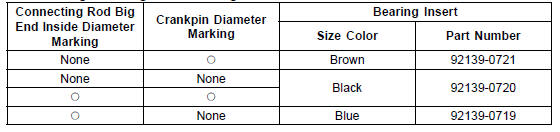
Connecting Rod Big End Bearing Insert Selection
Crankshaft Main Bearing Insert Selection
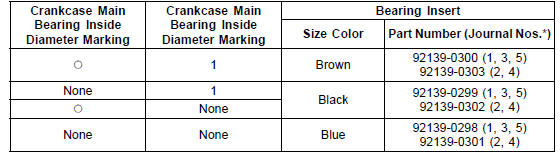
*: The bearing inserts for Nos. 2 and 4 journals have an oil groove, respectively.
 Exploded View
 Special Tools and Sealants
Brake Fluid Leak (Brake Hose and Pipe) Inspection
For KIBS equipped models, remove the fuel tank (see
Fuel Tank Removal in the Fuel System (DFI) chapter).
Apply the brake lever or pedal and inspect the brake fluid
leak from the brake hoses [A], pipes (KIBS equipped models)
[B] and fittings [C].
If the brake fluid leaked from any posit ...
Valve Guide Installation
Apply engine oil to the valve guide outer surface before
installation.
Heat the area around the valve guide hole to about 120
150°C (248 302°F).
NOTICE
Do not heat the cylinder head with a torch. This will
warp the cylinder head. Soak the cylinder head and
heat the oil.
Usin ...
Special Tools and Sealant
Oil Pressure Gauge, 10 kgf/cm²:
57001-164
Oil Pressure Gauge Adapter, PT3/8:
57001-1233
Outside Circlip Pliers:
57001-144
Liquid Gasket, TB1211:
56019-120
...