
Diode Circuit Inspection 
The resistance should be low in one direction and more than 10 times as much in the other direction. If any diode shows low or high in both directions, the diode is defective and the relay box must be replaced.
NOTE
The actual meter reading varies with the meter or tester used and the individual diodes, but generally speaking, the lower reading should be from zero to one half the scale.
Relay Box Internal Circuit
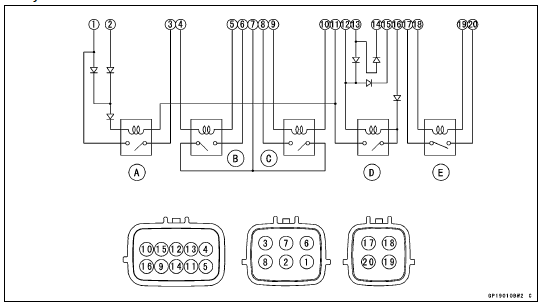
A: Headlight Circuit Relay
B: ECU Main Relay
C: Fuel Pump Relay
D: Starter Circuit Relay
E: Fan Relay
 Relay Circuit Inspection
 Fuse
FuseDFI System
1. ECU
2. Battery
3. Vehicle-down Sensor
4. Exhaust Butterfly Valve Actuator
5. Vacuum Chamber (Other than US, CA and CAL Models)
6. Air Intake Valve Actuator (Other than US, CA and CAL Models)
7. Air Intake Valve (Other than US, CA and CAL Models)
8. Air Flow
9. Air Intake Solenoid Valve ...
Parts Location
1. Timing Rotor
2. Crankshaft Sensor
3. Horn
4. Oil Pressure Switch
5. Rear Brake Light Switch
6. Oxygen Sensor (Equipped Models)
7. Alternator
8. Stator Coil
9. Gear Position Switch
10. Sidestand Switch
11. Immobilizer Amplifier (Equipped Models)
12. Radiator Fan Motor
1 ...
Rear Wheel Installation
Apply high-temperature grease to the grease seal lips.
Fit the collars on the both sides of the hub.
Left Side Collar [A]
Right Side Collar [B] (with Flange)
Engage the drive chain with the rear sprocket.
Install the caliper bracket [A] onto the stopper [B] of the
swingarm.
...