
Thickness Gauge [A]
Air Gap
Standard: 0.4  1.6 mm (0.02
 0.06 in.)
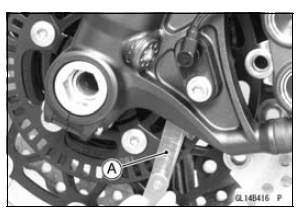
If the measurement is not the standard, check each part for deformation and looseness and correct accordingly.
If the measurement is the standard, go to next step.
If the sensor and sensor rotor in bad condition, remove the any deposits. Install the proper part or replace faulty part.
If the all items are good, go to next step.
If this service code appears even if all checks are ended, replace the KIBS hydraulic unit.
If the service code does not appear, the KIBS system normal (temporary failure).
 KIBS Motor Relay Inspection (Service Code b 35)
 Front Wheel Rotation Sensor Wiring Inspection (Service Code b 43)
Battery Ground
Before completing any service on the motorcycle, disconnect
the battery cables from the battery to prevent the engine
from accidentally turning over. Disconnect the ground
cable (–) first and then the positive (+). When completed
with the service, first connect the positive (+) cable to the
p ...
Radiator Fan Relay Inspection
Refer to the Relay Circuit Inspection in the Electrical System
chapter
If the radiator fan relay is normal, check the wiring for
continuity, using the wiring diagram in this section.
Special Tool - Hand Tester: 57001-1394
If the wiring is good, check the ECU for its ground and
power supp ...
Brake Light Switch Operation Inspection
Turn the ignition switch to ON.
The brake light (LED) [A] should go on when the brake
lever is applied or after the brake pedal is depressed
about 10 mm (0.39 in.).
If it does not, adjust the brake light switch.
Remove the front footpeg bracket (see Brake Pedal Removal
in the B ...