
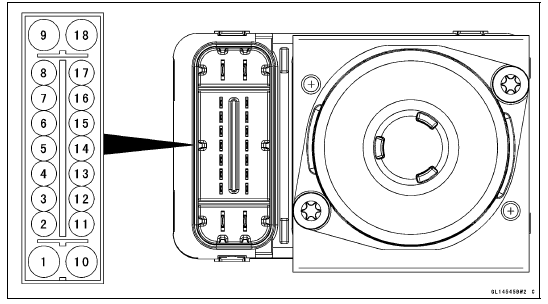
1. Ground: BK
2. CAN Communication Line (High): GY/BL
3. Front Wheel Rotation Sensor Signal Input: Y
4. Power Supply: BR/W
5. KIBS Kawasaki Self-Daignosis System Terminal: P
6. Front and Rear Brake Light Switch Signal: BL/R
7. Unused
8. Front Wheel Rotation Sensor Signal Output: G/Y
9. Power Supply to ABS Solenoid Valve Relay: R/BK
10. Ground to Motor: BK
11. CAN Communication Line (Low): LB
12. Power Supply to Front Wheel Rotation Sensor: W
13. Power Supply to Rear Wheel Rotation Sensor: R
14. Rear Wheel Rotation Sensor Signal Input: G
15. Unused
16. Rear Wheel Rotation Sensor Signal Output: R/Y
17. Unused
18. Power Supply to ABS Motor Relay: R/W
 KIBS System Circuit
 KIBS Servicing Precautions
Rear Caliper Removal
Remove:
Bolt [A]
Rear Wheel Rotation Sensor [B]
Loosen the banjo bolt [C] at the brake hose lower end,
and tighten it loosely.
Loosen the caliper holder pin [D].
Remove the rear wheel (see Rear Wheel Removal in the
Wheels/Tires chapter).
Unscrew the banjo bolt and remove t ...
Torque Limiter Installation
Apply molybdenum disulfide grease to the torque limiter
shaft [A].
Install the torque limiter [B], the collar [C] and the shaft.
Turn the large-hole end of the shaft to inside as shown in
the figure.
Replace the washer [D] with a new one.
Apply a non-permanent locking agent to the t ...
Cylinder Head Cover Installation
Replace the cylinder head cover gasket [A] with a new
one
Using a high flash-point solvent, clean off any oil or dirt
that may be on the silicone sealant coating area. Dry
them with a clean cloth.
Apply silicone sealant [B] to the cylinder head as shown
in the figure.
Sealant - Li ...