
NOTE
Be sure the battery is fully charged.
Main Harness [B] Oxygen Sensor [C]
Special Tool - Measuring Adapter: 57001-1700
Oxygen Sensor Heater Power Source Voltage Connections to Adapter: Digital Meter (+) → R (main harness W/R) lead Digital Meter (–) → Frame Ground terminal
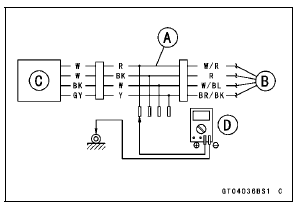
Power Source Voltage Standard: Battery Voltage
If the reading is in specification, but the problem still exists, replace the ECU (see ECU Removal/Installation in the Fuel System (DFI) chapter).
If the reading is out of the standard, check the following.
ECU Relay Fuse 15 A (see Fuse Inspection in the Electrical System chapter) Power Source Wiring (see Oxygen Sensor Circuit)
If the fuse and wiring are good, remove the ECU and check the wiring for continuity between harness connectors.
Special Tool - Hand Tester: 57001-1394
Disconnect the ECU and sensor connectors.

Wiring Continuity Inspection ECU Connector [A] ←→ Oxygen Sensor Connectors [B] R lead (ECU terminal 76) [C]
If the wiring is good, check the ECU for its ground and power supply (see ECU Power Supply Inspection in the Fuel System (DFI) chapter).
If the ground and power supply are good, replace the ECU (see ECU Removal/Installation in the Fuel System (DFI) chapter).
Oxygen Sensor Circuit
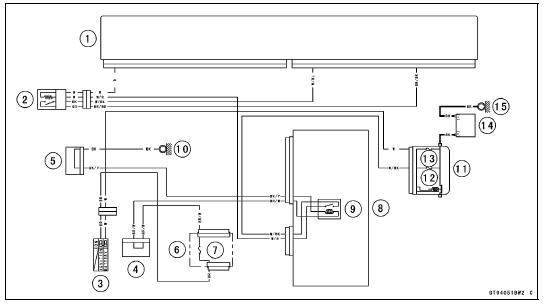
1. ECU
2. Oxygen Sensor
3. Ignition Switch
4. Joint Connector F
5. Joint Connector A
6. Fuse Box 1
7. Ignition Fuse 15 A
8. Relay Box
9. ECU Main Relay
10. Frame Ground 3
11. Starter Relay
12. ECU Fuse 15 A
13. Main Fuse 30 A
14. Battery
15. Engine Ground
 Oxygen Sensor Heater Resistance Inspection
 KIBS Hydraulic Unit Communication Error (Service Code 1b, KIBS Equipped
Models)
KIBS Hydraulic Unit Communication Error (Service Code 1b, KIBS Equipped
Models)Radiator and Cooling Fan
Check the radiator fins for obstruction
by insects or mud. Clean off
any obstructions with a stream of
low-pressure water.
WARNINGThe cooling fan spins at high
speed and can cause serious
injuries. Keep your hands and
clothing away from the cooling
fan blades at all times.
...
Shift Fork Guide Pin/Drum Groove Wear Inspection
Measure the diameter of each shift fork guide pin [A], and
measure the width [B] of each shift drum groove.
If the guide pin on any shift fork is less than the service
limit, the fork must be replaced.
Shift Fork Guide Pin Diameter
Standard: 6.9 7.0 mm (0.272
0.276 in.)
Service Limit: ...
Spring Plate Free Play Measurement
Insufficient clutch free play will cause the engine braking
effect to be more sudden, resulting in rear wheel hop. On
the other hand, if the free play is excessive, the clutch lever
may feel “spongy” or pulsate when pulled.
Hold an extra drive shaft in a vise and install the following
c ...