
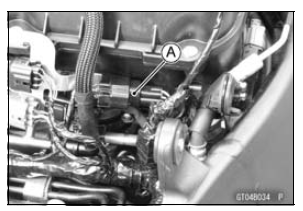
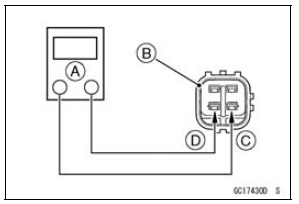
Oxygen Sensor Heater Resistance
Connections: W lead [C] ←→ W lead [D]
Standard: 6.7  10.5 Ω at 20° (68°F)
If the reading is out of the standard, replace the sensor.
If the reading is within the standard, check the power source voltage (see Oxygen Sensor Heater Power Source Voltage Inspection).
 Oxygen Sensor Heater Removal/Installation
 Oxygen Sensor Heater Power Source Voltage Inspection
Cable, Wire, and Hose Routing
1. Clamp (Hold the regulator/rectifier lead. Run the lead inside of the
installation hole.)
2. Clamp (Bend down the clamp, and hold the main harness and the vacuum hose
(equipped
models).)
3. Clamp (Hold the air intake solenoid valve lead (equipped models).)
4. Run the vacuum hose under ...
Rear Shock Absorber Scrapping
WARNINGPressurized nitrogen may explode when
heated.
The rear shock contains nitrogen gas. To avoid
an explosion, do not incinerate the shock body
without first releasing the nitrogen and removing
the shraeder valve.
Remove the rear shock absorber (see Rear Shock Ab ...
Warning/Indicator Lights
: When the
transmission is in
neutral, the neutral indicator light goes
on.
: When the
headlight is on high
beam, the high beam indicator light
goes on.
: When the
turn signal switch is
pushed to the left or right, the turn signal
indicator light blinks. ...