
NOTE
The free play adjustment is performed by replacing the steel plate(s).
Spring Plate Free Play
Usable Range: 0.05  0.70 mm (0.002
 0.028 in.)
Replace the following steel plate(s).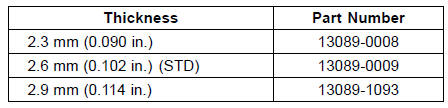
NOTE
Do not use the steel plate of 2.3 mm (0.090 in.) and 2.9 mm (0.114 in.) thickness at the same time.
Clutch Plate Assembly Length (Reference Information)
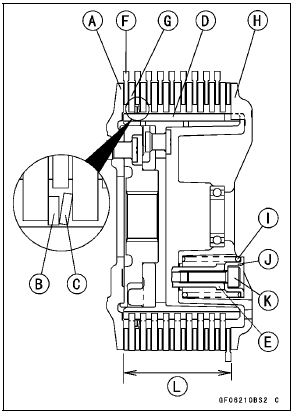
Clutch Hub [A] Spring Seat [B] Spring [C] Sub Clutch Hub [D] Sub Clutch Hub Bolts [E] New Friction Plates [F] Steel Plates [G] Spring Plate [H] Clutch Springs [I] Clutch Spring Holders [J] Clutch Spring Bolts [K]
Torque - Clutch Spring Bolts: 11 N·m (1.1 kgf·m, 97 in·lb)
Clutch Plate Assembly Length (Reference) 53.5 mm (2.11 in.)
NOTE
The length of the clutch plate assembly changes by the steel plate thickness.
 Spring Plate Free Play Measurement
 Clutch Plate, Wear, Damage Inspection
Lubrication
Lubrication is necessary after riding
through rain or on wet roads, or any
time that the chain appears dry.
Use a lubricant for sealed chains to
prevent deterioration of chain seals. If
the chain is especially dirty, clean it
using a cleaner for sealed chains following
the instructions suppli ...
Catalytic Converter
This motorcycle is equipped with a
catalytic converter in the exhaust system.
The converter reacts with carbonmonoxide,
hydrocarbons and nitrogen
oxides to convert them into carbon
dioxide, water, nitrogen and oxygen resulting
in much cleaner exhaust gases
to be discharged into the atmosphe ...
Wheel Bearing Damage Inspection
Raise the front wheel off the ground with the jack (see
Front Wheel Removal in the Wheels/Tires chapter).
Special Tools - Jack: 57001-1238
Jack Attachment: 57001-1608
Turn the handlebar all the way to the right or left.
Inspect the roughness of the front wheel bearing by moving
[A] ...