
Insufficient clutch free play will cause the engine braking effect to be more sudden, resulting in rear wheel hop. On the other hand, if the free play is excessive, the clutch lever may feel “spongy” or pulsate when pulled.
Collar [A]
Needle Bearing [B]
Sleeve [C]
Clutch Housing [D]
Spacer [E]
Clutch Hub [F]
Sub Clutch Hub [G]
Friction Plates (48 Lining Blocks) [H] (#1, #10)
Steel Plates (T = 2.9) [I] (#1 
#7)
Spring Seat [J]
Spring [K]
Friction Plates (36 Lining Blocks) [L] (#2
 #9)
#9)
Steel Plates (T = 2.6) [M] (#8, #9)
Clutch Spring Plate [N]
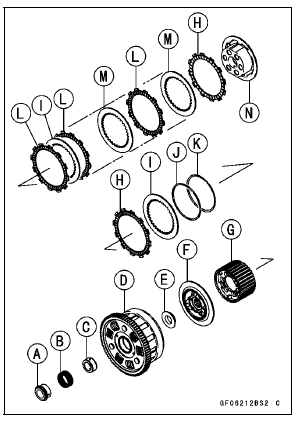
Drive Shaft [D]
Spring Plate Free Play
Usable Range: 0.05  0.70 mm (0.002
 0.028 in.)
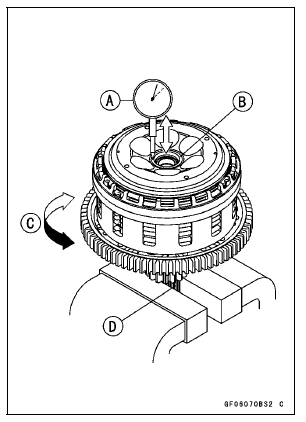
If the free play is not within the usable range, change all of the friction plate and measure the free play again.
If the free play is not within the usable range, adjust the free play (see Spring Plate Free Play Adjustment).
 Clutch Installation
 Spring Plate Free Play Adjustment
Piston Installation
Apply molybdenum disulfide oil solution to the oil ring expander,
and install the oil ring expander [A] in the bottom
piston ring groove so the ends [B] not butt together
Applymolybdenum disulfide oil solution to the oil ring steel
rails, and install the oil ring steel rails, one above th ...
Muffler Body Installation
Replace the muffler body gasket [A] with a new one.
Install the muffler body gasket to the premuffler chamber
[B] until it is bottomed so that the chamfer side faces premuffler
chamber.
Install the muffler body clamp [C] as shown in the figure.
Insert the projection [D] into the slot [ ...
Throttle Body Assy Removal
WARNINGGasoline is extremely flammable and can be
explosive
under certain conditions, creating the
potential for serious burns. Make sure the area is
well-ventilated and free from any source of flame
or sparks; this includes any appliance with a pilot
light. Do not smoke. T ...