
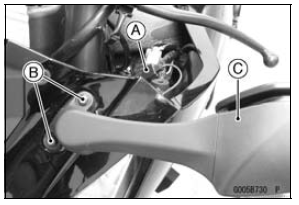
Take the hoses [A] off the canister [B].
Open the clamp [C].
Remove the quick rivet [D].
 Lower Fairing Installation
 Upper Fairing Assembly Installation
For Secondary Fuel Injectors
Remove the fuel tank (see Fuel Tank Removal).
Disconnect the injector connector and connect the harness
adapter [A] between these connectors as shown in
the figure.
Main Harness [B]
Secondary Fuel Injector #1 [C]
Special Tool - Measuring Adapter: 57001-1700
Connect a digital me ...
Front Fork Removal (Each Fork Leg)
Loosen the front fork top plug [A] beforehand if the fork
leg is to be disassembled.
Special Tool - Top Plug Wrench (45 mm) [B]: 57001-1741
NOTE
Loosen the top plug after loosening the handlebar
clamp bolt [C] and upper front fork clamp bolt [D].
Remove:
Upper Fairing Assembly (see Up ...
Spark Plug Condition Inspection
Remove the spark plugs (see Spark Plug Replacement in
the Periodic Maintenance chapter).
Visually inspect the spark plugs.
If the spark plug center electrode [A] and/or side electrode
[B] are corroded or damaged, or if the insulator [C]
is cracked, replace the plug.
If the spark plug is ...